
If you have ever abandoned a bread recipe because it demanded proofing yeast, waiting two hours for dough to rise, and kneading until your arms ache, you know how tempting it is to just buy a loaf instead. But what if you could pull a warm, golden, crusty homemade bread out of your oven in under an hour, using just three ingredients you probably already have?
That is the magic of a beer bread recipe:
- No yeast packets
- No proofing time
- No kneading
- Just a bowl, a spoon, and a can of beer doing the heavy lifting
I have made this bread more times than I can count — for weeknight dinners, potlucks, and lazy Sunday soup nights — and it never fails. It is forgiving, fast, and tastes like you spent way more effort than you actually did. This is a real, tested method, refined through dozens of loaves and a few memorable failures (looking at you, flat beer that produced a bread the texture of a hockey puck). By the end of this guide, you will understand not just the recipe, but the reasoning behind every ingredient, so you can troubleshoot and customise with confidence. For more on this, see our guide on easy meatball recipe.
Why Beer Bread Works (The Science Made Simple)
Traditional bread relies on yeast to produce carbon dioxide, which gets trapped in the dough and makes it rise. Beer bread skips yeast entirely because beer already contains the leavening power it needs.
Here is what is actually happening in your mixing bowl:
- Carbonation – The bubbles in beer add lift, similar to how sparkling water aerates batter.
- Residual yeast and fermentation byproducts – Beer is brewed using yeast, and trace amounts of that fermentation activity linger in the liquid, contributing a subtle rise and flavour.
- Self-rising flour – Most beer bread recipes pair beer with self-rising flour, which already contains baking powder and salt. This chemical leavening agent reacts with liquid and heat to create additional lift.
In short, you are combining chemical leavening (baking powder) with the natural carbonation and flavour complexity of beer. That is why this bread has a tender, slightly chewy crumb and a crust that is crisp without being tough. The United States Department of Agriculture notes that chemical leavening is a safe and effective method for quick breads, and beer provides an additional flavour dimension that dry leavening alone cannot replicate.
The Classic 3-Ingredient Beer Bread Recipe
This is the base recipe — the one that started it all. Once you have mastered it, you can experiment endlessly.
Ingredients
- 3 cups self-rising flour
- 3 tablespoons sugar (optional, but recommended for balance)
- 12 ounces beer (any variety, room temperature works best)
That is it. Three ingredients, and you have real, structured, sliceable bread.
A quick note on the sugar: technically you can make this with just flour and beer, making it a true 2-ingredient bread. But the sugar helps the crust caramelise beautifully and rounds out the beer’s bitterness, so most bakers count it as part of the “3-ingredient” formula.
Step-by-Step Instructions
- Preheat your oven to 375°F (190°C). Grease a 9×5-inch loaf pan.
- Whisk together the self-rising flour and sugar in a large bowl.
- Pour in the beer slowly, stirring with a wooden spoon or spatula just until combined. The batter will be thick, sticky, and a little lumpy — that is exactly what you want. Overmixing develops gluten and makes the bread tough.
- Transfer the batter into your prepared loaf pan, smoothing the top with a spatula.
- Bake for 40–50 minutes, until the top is deep golden brown and a toothpick inserted in the centre comes out clean.
- Optional finishing touch: Brush the hot loaf with 2–3 tablespoons of melted butter as soon as it comes out of the oven. This softens the crust and adds richness.
- Cool for at least 10 minutes before slicing. I know it is tempting to cut in immediately, but the crumb needs a few minutes to set, or you will end up with a gummy centre.
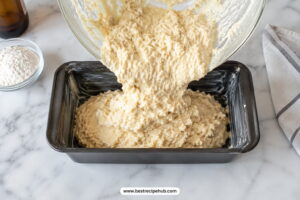
The batter is thick and lumpy — do not overmix it.
Choosing the Best Beer for Beer Bread
This is where personal experience really matters — the beer you choose fundamentally changes the final loaf, and there is no single “correct” answer. Here is what I have learned from testing different styles side by side:
- Lagers and pilsners – Produce a light, mild, everyday bread. Great as a starting point if you are new to this.
- Amber ales and brown ales – Add a deeper, slightly nutty, toasty flavour that pairs beautifully with soups and stews.
- Stouts and porters (like Guinness) – Create a darker, richer loaf with subtle coffee and chocolate notes. Fantastic alongside chili or beef stew.
- IPAs – Bring a hoppy bitterness that can be an acquired taste in bread; they work best if you love that bold, bitter edge.
- Wheat beers – Add a soft, slightly fruity or citrusy character that is excellent with cheese boards.
Pro tip: Avoid beers that are extremely hoppy or sour unless you specifically want that flavour to dominate. A moderate, well-balanced beer almost always produces the most crowd-pleasing loaf.
Non-alcoholic beer works too, and the alcohol content largely bakes off during cooking anyway, so this bread is family-friendly regardless of which beer you choose.
No Self-Rising Flour? Here Is Your Substitute
Self-rising flour is not a pantry staple for everyone, but you can easily make your own substitute:
- 3 cups all-purpose flour
- 4½ teaspoons baking powder
- 1½ teaspoons salt
Whisk these together thoroughly before combining with your beer and sugar. This DIY blend performs almost identically to store-bought self-rising flour, so do not worry if you are out of it.
Easy Variations to Make It Your Own
Once you have nailed the base recipe, this bread becomes a blank canvas. Here are variations I return to again and again:
- Cheesy Beer Bread – Fold in 1 to 1½ cups of shredded sharp cheddar into the batter before baking. The cheese creates pockets of gooey, savoury richness throughout the loaf — this version disappears the fastest at gatherings.
- Garlic Herb Beer Bread – Add 1 teaspoon garlic powder, 1 tablespoon fresh chopped rosemary or thyme, and a pinch of black pepper to the dry ingredients. Brush the finished loaf with garlic butter instead of plain melted butter.
- Sweet Honey Beer Bread – Replace the sugar with 3 tablespoons of honey, and use a wheat beer or light lager. This version is fantastic toasted with butter for breakfast.
- Jalapeño Cheddar Beer Bread – Combine the cheesy variation with 1–2 diced jalapeños (seeds removed for less heat). Pair this with a pot of chili for an unbeatable combo.
- Whole Wheat Beer Bread – Swap up to half of the self-rising flour for whole wheat self-rising flour (or make your own whole wheat blend using the substitute ratio above) for a heartier, fibre-rich loaf.
If you are looking for more complete meal ideas, our collection of one-pot pasta recipes pairs beautifully with a slice of cheesy beer bread.
Common Mistakes That Ruin Beer Bread (And How to Avoid Them)
Even with only three ingredients, there are a few pitfalls that trip people up:
- Overmixing the batter – Stir just until the flour disappears. A lumpy batter is normal and desirable.
- Using flat, warm beer straight from an open can left overnight – While room-temperature beer is fine, beer that has lost its carbonation will not provide as much lift.
- Skipping the butter topping – This is not strictly necessary, but without it, the crust can turn out dry and overly hard.
- Cutting into it too soon – Slicing hot bread compresses the crumb and can make it seem underbaked even when it is not.
- Wrong pan size – A pan too large spreads the batter thin and dries it out; too small, and it may not cook through in the centre. Stick with a standard 9×5-inch loaf pan.
- Old baking powder in homemade self-rising flour – If your flour substitute is not rising properly, check that your baking powder is fresh — it loses potency over time.
How to Store and Freeze Beer Bread
Because beer bread has no preservatives and a simple ingredient list, it is best enjoyed within a few days, but it stores well if you plan ahead.
- At room temperature – Wrap tightly in plastic wrap or store in an airtight container for up to 3 days.
- In the refrigerator – Extends freshness to about a week, though the texture is best at room temperature.
- In the freezer – Wrap the cooled loaf (whole or sliced) tightly in plastic wrap, then foil, and freeze for up to 3 months. Thaw at room temperature or warm slices in a toaster.
Reheating tip: A few minutes in a 300°F oven revives day-old beer bread beautifully, restoring some of that fresh-baked crust.
Scaling the Recipe: Muffins, Mini Loaves, and Double Batches
This recipe is far more flexible than a single 9×5-inch loaf suggests:
- Muffins – Divide the batter into a greased 12-cup muffin tin and bake at 375°F for 18–22 minutes. This is ideal for portion control or serving alongside individual bowls of soup.
- Mini loaves – Split the batter between two or three mini loaf pans and reduce the bake time to roughly 25–30 minutes. These make great gifts, especially wrapped in parchment and twine.
- Double batch – Simply double every ingredient and bake in two separate loaf pans rather than one oversized pan, which would cook unevenly. This is a smart move for potlucks, holiday gatherings, or anytime you know a single loaf will not be enough.
- Halving the recipe – If you only want a small loaf, cut all three ingredients in half and use a smaller pan, such as a 7×3-inch mini loaf pan, adjusting bake time down by about 10 minutes.
Regardless of the size you choose, the toothpick test remains the most reliable way to check doneness — visual browning alone can be misleading, especially with darker beers that naturally produce a deeper crust colour.
What to Serve with Beer Bread
This loaf’s rustic texture pairs well with:
- Hearty soups like tomato bisque, potato leek, or French onion soup
- Chili and stews, where it is perfect for soaking up sauce
- Cheese and charcuterie boards, especially the herb or honey variations
- Simply sliced and buttered as a snack or breakfast bread
For a complete meal, try serving it alongside some easy air fryer recipes like crispy chicken wings or roasted vegetables, which complement the bread’s malty sweetness.
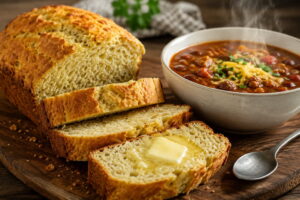
A hearty slice of beer bread next to tomato soup — a classic pairing.
Nutritional Snapshot and Dietary Considerations
A standard slice of classic beer bread (based on a loaf cut into 12 slices) generally contains roughly:
- 150–180 calories
- 3–4 grams of protein
- 1–3 grams of fat (more if you add the butter topping)
- 28–32 grams of carbohydrates
- Less than 1 gram of fibre, unless made with whole wheat flour
These numbers shift depending on your beer choice, whether you add cheese or sugar, and your slice thickness — but as a baseline, beer bread sits comfortably in line with other quick breads like banana bread or cornbread, minus the added fruit sugars.
A few dietary notes worth knowing:
- Alcohol content – Most of the alcohol in the beer evaporates during baking, though trace amounts (generally under 1%) may remain, similar to using wine in a sauce. If you are serving this to children, pregnant guests, or anyone avoiding alcohol entirely, stick with a non-alcoholic beer.
- Gluten – This recipe is not gluten-free, since both the flour and most beers contain gluten. Gluten-free self-rising flour blends combined with a certified gluten-free beer can work as a substitute, though the texture will differ slightly.
- Sodium – Self-rising flour already contains salt, so avoid adding extra salt unless a variation specifically calls for it.
- Sugar – The 3 tablespoons of sugar in the base recipe is optional and can be reduced or omitted for a less sweet, more rustic loaf.
Equipment You Will Need
This recipe demands almost no specialised equipment. You likely already have everything on hand:
- A large mixing bowl
- A wooden spoon or rubber spatula (no electric mixer required)
- A standard 9×5-inch loaf pan
- Measuring cups
- A toothpick or thin skewer for doneness testing
- A wire cooling rack (optional, but helps prevent a soggy bottom crust)
Because there is no kneading, proofing, or shaping involved, you can go from pantry to oven in under 10 minutes of active prep time. If you are planning a larger baking session, you might also enjoy our easy meatball recipe for a hearty dinner that uses the same simple, no-fuss approach.
Troubleshooting: Fixing Common Beer Bread Problems
Even a nearly foolproof recipe can go sideways occasionally. Here is how to diagnose and fix the most common issues:
- The loaf did not rise much – This is typically caused by flat beer, expired baking powder, or old self-rising flour that has lost its potency. Always check expiration dates, and pour the beer in while it is still actively fizzing.
- The crust is too hard – Skipping the melted butter topping, or baking at too high a temperature, can lead to an overly tough crust. Stick to 375°F and brush with butter immediately after baking.
- The bread collapsed after baking – This often means it was slightly underbaked in the centre or cut too soon. Always verify doneness with a toothpick and allow a full cooling rest before slicing.
- The bread tastes bitter – Certain hoppy beers, particularly IPAs, can leave a noticeably bitter aftertaste. If this happens, try a maltier beer like a lager, amber ale, or stout next time.
- The loaf is too crumbly to slice cleanly – Use a serrated bread knife and let the loaf cool completely (not just 10 minutes, but ideally closer to 30–45 minutes) for the cleanest slices.
Beer Bread vs. Traditional Yeast Bread: Key Differences
Understanding how beer bread compares to classic yeast bread helps set the right expectations:
| Aspect | Beer Bread | Yeast Bread |
|---|---|---|
| Rise time | Zero proofing time | 1–3 hours (or more) |
| Texture | Denser, more cake-like crumb | Airier, more open structure |
| Skill level | Beginner-friendly, nearly foolproof | Requires more technique and practice |
| Flavour complexity | Gets complexity instantly from the beer | Develops through fermentation over time |
| Shelf life | Best within 3 days | Stays fresh slightly longer |
Neither is “better” — they simply serve different purposes. When you want bread now, beer bread wins every time. You can even use it as a base for other quick bread recipes, like our homemade cinnamon roll recipe if you want to swap the beer for a sweet dough approach.
Final Thoughts
Beer bread is proof that homemade bread does not have to be intimidating. With just three ingredients, no yeast, and about an hour of your time, you can pull a rustic, flavourful loaf straight from your own oven. Whether you stick with the classic version or start experimenting with cheese, herbs, or a favourite stout, this recipe rewards creativity while staying reliably simple — the kind of bread you will eventually make from memory, without even glancing at a card.
Frequently Asked Questions
Does beer bread taste like beer?
Beer bread has a mild, malty flavour rather than a strong beer taste. Most of the sharper, boozy notes bake off in the oven, leaving behind a subtle richness and slight sweetness depending on the beer used.
Can I make beer bread without alcohol?
Yes. Non-alcoholic beer works just as well as regular beer, since the carbonation and malt flavour — not the alcohol — are what make this bread rise and taste good.
Why is my beer bread dense or gummy in the middle?
This usually happens from undercooking, cutting the loaf too soon, or using a pan that is too small. Bake until a toothpick comes out clean and let the loaf rest at least 10 minutes before slicing.
Can I use any type of beer for beer bread?
Yes, almost any beer works, though lagers and ales produce milder, more universally appealing loaves, while stouts and IPAs create bolder, more distinct flavours. Avoid extremely sour or heavily hopped beers unless you want that flavour to stand out.
Do I need a stand mixer to make beer bread?
No. Beer bread is deliberately low-effort and only requires a bowl and a spoon or spatula. In fact, overmixing with a stand mixer can make the bread tough, so hand-mixing is actually preferred.
How long does beer bread last?
Beer bread stays fresh for about 3 days at room temperature in an airtight container, up to a week in the refrigerator, and up to 3 months in the freezer when wrapped tightly.
Can I substitute self-rising flour with regular flour?
Yes. Combine 3 cups all-purpose flour with 4½ teaspoons baking powder and 1½ teaspoons salt to create a homemade self-rising flour substitute that works just as well.
Is beer bread healthier than regular bread?
Beer bread is not necessarily healthier, but it does contain fewer additives and preservatives than many store-bought breads since it uses just a few simple, recognisable ingredients. For more wholesome meal ideas, browse our recipes collection that focuses on whole foods and minimal processing.


