
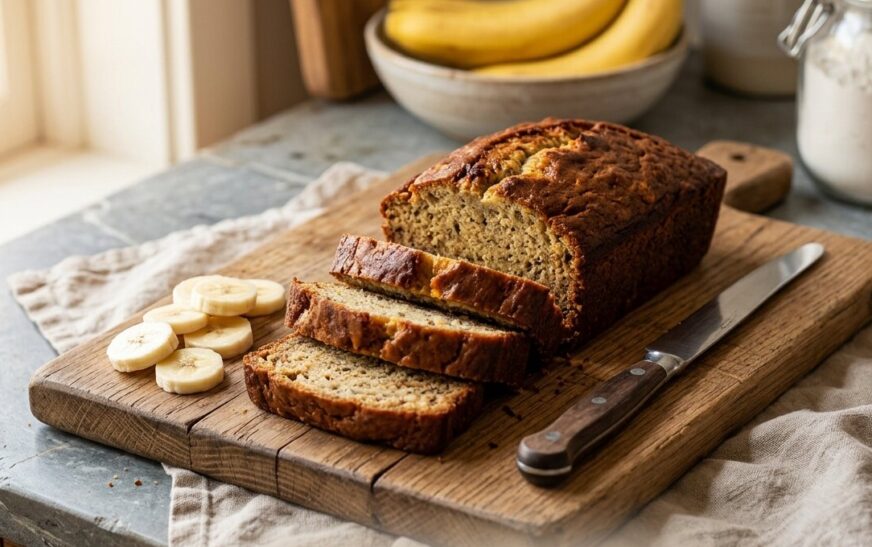
You know the moment. Three bananas sit on your counter, skin freckled brown, too soft to eat but too good to toss. That’s not a problem – it’s the start of the best banana bread recipe you’ll make this year.
This isn’t a recipe that demands a trip to the store or a stand mixer you don’t own. It’s built entirely around pantry staples already sitting in your kitchen right now: flour, sugar, eggs, butter, and those overripe bananas you were about to feel guilty about. In under an hour, you’ll have a loaf that’s moist, tender, and deeply banana-flavored.
I’ve made this exact recipe more times than I can count, tweaking it through dozens of batches to land on a version that’s forgiving for beginners but still produces bakery-quality results. Here’s what you’ll get from this guide:
- The exact ingredients and ratios that produce a moist, tender crumb every time.
- A clear, numbered baking process with no guesswork.
- The science, pro tips, and common mistakes that separate a good loaf from a great one.
Why This Banana Bread Recipe Works Every Time
Banana bread has a reputation for being foolproof, but small missteps – overmixing, underripe fruit, the wrong pan – can turn a promising batter into a dense or gummy loaf. This recipe avoids those pitfalls by design. Here’s what makes it reliable:
- No special equipment required – a bowl, a fork, and a loaf pan are all you need.
- Forgiving ratios – the recipe tolerates slight variations in banana size or flour measurement without falling apart.
- Built-in moisture control – using melted butter instead of softened butter creates a denser, more tender crumb that stays moist for days.
- One-bowl simplicity – fewer dishes, less time, and less room for error.
There’s also a practical reason this recipe has earned a permanent spot in so many home kitchens:
- It solves a real problem – bananas ripen faster than most households can eat them.
- Tossing spotty bananas in the trash feels wasteful when they’re actually at peak flavor for baking.
- This recipe turns that “problem” into the best part of the loaf – the riper the banana, the better the bread.
Ingredients You Already Have in Your Kitchen
This easy banana bread recipe sticks to ingredients found in almost any American pantry. No specialty flours, no hard-to-find extracts. You’ll need:
- 3 ripe bananas, mashed (the spottier and softer, the better)
- 1/3 cup melted butter
- 3/4 cup sugar (white, brown, or a mix of both)
- 1 large egg, beaten
- 1 teaspoon vanilla extract
- 1 teaspoon baking soda
- A pinch of salt
- 1 1/2 cups all-purpose flour
Optional add-ins worth considering:
- A dash of cinnamon for warmth.
- A handful of chopped walnuts for crunch.
Neither is required, but both elevate the final loaf without complicating the process.

Step-by-Step Banana Bread Recipe
Follow these steps in order. The sequence matters more than most people realize – it’s the difference between a light, fluffy crumb and a dense, gummy one.
- Prep your pan and oven. Preheat to 350°F (175°C) and grease a standard 4×8-inch loaf pan with butter or nonstick spray. This prevents the loaf from sticking after baking.
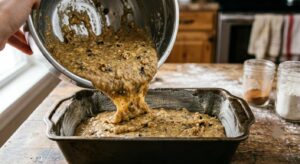
- Mash the bananas. In a large bowl, mash with a fork until mostly smooth – a few small lumps are fine and even desirable for texture.
- Mix the wet ingredients. Stir in the melted butter, sugar, beaten egg, and vanilla extract until just combined.
- Add the dry ingredients. Sprinkle the baking soda and salt over the mixture, stir briefly, then add the flour. Mix until the flour just disappears – no more. Overmixing develops gluten, leading to a tough loaf instead of a tender one.
- Bake for 55–65 minutes. Start checking at the 50-minute mark with a toothpick. It should come out clean or with a few moist crumbs, not wet batter.
- Cool before slicing. Let the bread cool in the pan for 10 minutes, then move it to a wire rack to cool completely. Slicing too early produces a gummy texture, even if the loaf is fully baked.
Pro Tips for the Best Banana Bread
After dozens of test batches, these details consistently separate an average loaf from an excellent one:
- Use bananas that are almost black. Underripe bananas lack the natural sugars and moisture that give banana bread its signature flavor.
- Don’t skip the resting period. Banana bread actually tastes better the next day, once the flavors settle.
- Measure flour correctly. Spoon flour into the measuring cup and level it off, rather than scooping directly from the bag.
- Check your baking soda’s freshness. Old baking soda loses potency, resulting in a loaf that doesn’t rise properly.
- Tent with foil if the top browns too fast. If the crust darkens before the center sets, loosely cover the loaf for the remaining bake time.
Common Mistakes to Avoid
Even experienced bakers run into these issues. Knowing them in advance saves a wasted loaf:
- Overmixing the batter, which activates gluten and creates a dense, rubbery texture.
- Using cold butter or eggs, which can cause the batter to separate and bake unevenly.
- Skipping the toothpick test, leading to an underbaked center that collapses after cooling.
- Opening the oven door too often, which drops the internal temperature and extends bake time unpredictably.
- Using a pan that’s too large, which spreads the batter thin and results in a flat, dry loaf.
The Science Behind a Perfect Loaf
Understanding why each ingredient matters makes you a better baker, not just a recipe-follower:
- Bananas contribute moisture, natural sugar, and acidity. As bananas ripen, their starches convert to sugar, which is why a blackened banana bakes into a richer-flavored loaf than a yellow one.
- Baking soda reacts with the natural acidity in the bananas to produce carbon dioxide, which gives the loaf its rise. This is why banana bread typically uses baking soda rather than baking powder – the acid-base reaction is already built into the batter.
- Melted butter coats the flour’s gluten strands more thoroughly than softened butter does, slowing gluten development and keeping the texture soft rather than chewy.
- Eggs provide structure and bind the batter, while also adding a small amount of leavening through the air incorporated during mixing.
Knowing this explains why substitutions behave the way they do – and gives you the confidence to adjust the recipe based on what’s actually in your kitchen.
Easy Variations to Customize Your Banana Bread
Once you’ve mastered the base recipe, it becomes a template for endless variations:
- Chocolate chip banana bread – fold in 1/2 cup of semi-sweet chocolate chips for a dessert-like version.
- Nutty banana bread – add 1/2 cup chopped walnuts or pecans for texture and depth.
- Healthier banana bread – swap half the all-purpose flour for whole wheat flour, or reduce sugar by a quarter.
- Spiced banana bread – add 1/2 teaspoon cinnamon and a pinch of nutmeg for a warm, fall-inspired flavor.
- Banana muffins – pour the same batter into a muffin tin and reduce bake time to 18–22 minutes.
Each variation uses the same core ratios, which is part of what makes this recipe so practical for repeat use.
How to Store and Freeze Banana Bread
Proper storage extends the life of your loaf and keeps the texture from drying out:
- Room temperature – wrap tightly in plastic wrap or store in an airtight container for up to 4 days.
- Refrigerator – extends freshness to about a week, though the texture firms up slightly when chilled.
- Freezer – wrap individual slices or the whole loaf in plastic wrap, then foil, and freeze for up to 3 months. Thaw at room temperature or warm gently in the microwave.
Freezing is particularly useful if you tend to bake in batches – banana bread freezes exceptionally well without losing its moist texture.
A Recipe Worth Repeating
What makes this banana bread recipe worth keeping isn’t novelty – it’s reliability. To recap the essentials:
- Use very ripe, spotted bananas for the best flavor and moisture.
- Mix gently and stop as soon as the flour disappears.
- Bake at 350°F for 55–65 minutes and confirm doneness with a toothpick.
- Let the loaf cool fully before slicing.
- Store or freeze properly to keep it fresh for days or months.
Whether you’re rescuing spotty bananas before they go to waste or building a weekend baking tradition, this recipe holds up to repetition in a way few quick breads do.
Frequently Asked Questions
Q: What is the secret to moist banana bread?
A: The secret is using very ripe, heavily spotted bananas and avoiding overmixing the batter. Ripe bananas add natural moisture and sugar, while minimal mixing keeps the crumb tender rather than dense.
Q: Can I make banana bread without baking soda?
A: Baking soda is the primary leavening agent in most banana bread recipes, so it’s not recommended to skip it. If unavailable, baking powder can be substituted at roughly three times the amount, though the texture and rise will differ slightly.
Q: How many bananas do I need for one loaf of banana bread?
A: Most standard recipes, including this one, use 3 medium to large ripe bananas, which equals roughly 1 to 1.5 cups of mashed banana.
Q: Why did my banana bread sink in the middle?
A: A sunken center is usually caused by underbaking, too much leavening agent, or opening the oven door too early during baking. Using a toothpick to confirm doneness before removing the loaf helps prevent this.
Q: Can I use frozen bananas for banana bread?
A: Yes. Thaw frozen bananas completely, drain excess liquid if needed, and mash as usual. Frozen bananas often work even better since freezing breaks down their structure and intensifies sweetness.
Q: How do I know when banana bread is fully baked?
A: Insert a toothpick into the center of the loaf; it should come out clean or with a few moist crumbs, not wet batter. This typically happens between 55 and 65 minutes at 350°F.
Q: Can I substitute oil for butter in banana bread?
A: Yes, vegetable or canola oil can replace melted butter in equal amounts. The texture will be slightly more moist and less rich, since butter contributes flavor that oil does not.
Q: How long does homemade banana bread last?
A: Properly stored, banana bread lasts about 4 days at room temperature, up to a week refrigerated, and up to 3 months frozen when wrapped tightly.


2 Comments
[…] with pantry-staple ingredients you probably already […]
[…] ingredients — most already in your […]