
A perfect, creamy cheesecake doesn't require an oven, a water bath, or any complicated techniques. This no bake cheesecake comes together in about 20 minutes of active prep time and sets in the refrigerator while you go about your day. The result is a dessert that rivals any baked version — silky, rich, and impressively sliceable.
Whether you're hosting a summer gathering, celebrating a birthday, or simply craving something sweet on a weeknight, this is the dessert that delivers every time. You can also read our guide on homemade cinnamon roll recipe.
Why Choose a No Bake Cheesecake?
Traditional baked cheesecake demands precision: a carefully timed water bath, watchful temperature control, and the ever-present risk of cracks ruining the surface. A no bake approach eliminates all of that anxiety.
Here is what makes this method superior for home cooks:
- Zero oven time — no preheating, no monitoring, no worrying
- 15–20 minutes hands-on prep — mix, press, pour, chill
- Consistent results — beginners and experienced bakers alike get the same creamy texture
- No cracking — the filling sets evenly without stress
- Make-ahead friendly — it actually tastes better on day two
This recipe has been tested across multiple kitchens with different refrigerators, climates, and equipment. It works reliably every single time. You can also read our guide on easy healthy air fryer recipes.
The Science: How a No Bake Cheesecake Actually Sets
Understanding how this dessert works helps you troubleshoot and adapt it confidently.
Baked Cheesecake Relies On:
- Eggs coagulating under heat
- Protein structure forming as the cheesecake bakes and cools
No Bake Cheesecake Relies On:
- Cold temperature — refrigeration gradually firms the fat in cream cheese and cream
- Fat content — full-fat cream cheese provides the body needed to hold shape without eggs
- Whipped cream — air bubbles create structure and lightness; the fat in cream stabilises those bubbles
- Optional gelatin — adds extra firmness for warm kitchens or humid climates
The texture you get is lighter than a baked cheesecake — almost mousse-like — and many professional pastry chefs prefer this style for its clean, fresh finish.
Ingredients You Need
Each ingredient plays a specific role. Substitutions can work, but understanding what changes will do helps you avoid disappointing results. You can also read our guide on baked chicken thigh recipes.
For the Graham Cracker Crust
| Ingredient | Amount | Purpose |
|---|---|---|
| Graham cracker crumbs | 1½ cups (150g) | Base flavour and structure |
| Unsalted butter, melted | ⅓ cup (75g) | Binds crumbs together |
| Granulated sugar | 3 tablespoons (38g) | Sweetness and helps crust firm when chilled |
For the Cheesecake Filling
| Ingredient | Amount | Purpose |
|---|---|---|
| Full-fat cream cheese, softened | 16 oz (450g) | Body and richness — non-negotiable |
| Powdered sugar | 1 cup (120g) | Dissolves completely without grittiness |
| Pure vanilla extract | 1 teaspoon | Depth and bakery-quality flavour |
| Heavy whipping cream, cold | 1 cup (240ml) | Structure and airy texture when whipped |
| Fresh lemon juice | 2 tablespoons | Brightens flavour, enhances tang |
| Unflavoured gelatin (optional) | 1 teaspoon | Firmer set for warm environments |
A common mistake is using cream cheese straight from the refrigerator. It must sit at room temperature for at least 45 minutes before mixing. Cold cream cheese forms stubborn lumps that no amount of beating will fully remove.
Step-by-Step Instructions
Follow each step in order. Rushing any stage is the fastest way to end up with a disappointing cheesecake.
1. Prepare the Crust
- In a medium bowl, combine graham cracker crumbs, melted butter, and granulated sugar.
- Stir until the mixture looks like wet sand and holds together when pressed between your fingers.
- Transfer to a 9-inch springform pan. Press firmly and evenly across the bottom and about 1 inch up the sides.
- Use the flat bottom of a measuring cup to compact the crust tightly — a loose crust crumbles when sliced.
- Refrigerate the crust for at least 20 minutes (or freeze for 10 minutes) while you prepare the filling.
2. Whip the Heavy Cream
- Place your mixing bowl and beaters in the freezer for 10 minutes before starting.
- Pour the cold heavy cream into the chilled bowl.
- Beat on medium-high speed with an electric mixer until stiff peaks form — the cream should stand up firmly when you lift the beaters.
- This typically takes 3–4 minutes.
- Transfer the whipped cream to a separate bowl and refrigerate it while you make the base.
Why a cold bowl matters: Keeping the cream cold during whipping helps it reach stiff peaks faster and hold that structure through the folding process. You can also read our guide on best baked chicken thigh recipes.
3. Make the Cream Cheese Base
- In the same mixing bowl, beat the softened cream cheese on medium speed for 2–3 minutes until completely smooth and fluffy.
- Add powdered sugar, vanilla extract, and lemon juice.
- Beat for another 1–2 minutes until the mixture is velvety and well combined.
- Taste the filling — it should be pleasantly sweet with a subtle tang. Adjust with a little extra lemon juice if desired.
4. Fold in the Whipped Cream
This is the most important step in the entire recipe.
- Remove the whipped cream from the refrigerator.
- Add it to the cream cheese mixture in three separate additions.
- Use a rubber spatula to gently fold using a J-shaped motion — scoop from the bottom and fold over the top.
- Stop as soon as no white streaks remain.
Critical warning: Do not stir, whisk, or beat the cream in. Folding preserves the air that gives the cheesecake its light texture. Stirring deflates it completely, resulting in a dense, heavy filling.
5. Fill and Refrigerate
- Pour the filling into the chilled crust.
- Smooth the top with an offset spatula or the back of a spoon.
- Cover tightly with plastic wrap, pressing it gently against the surface to prevent a skin from forming.
- Refrigerate for a minimum of 6 hours. Overnight (8–12 hours) is strongly recommended for the best texture and cleanest slice.
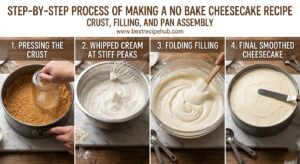 Assembling a no bake cheesecake — crust pressed firmly, filling poured, and ready to chill.
How to Tell When Your Cheesecake Is Ready
Unlike a baked cheesecake, there is no golden top to check. Instead, look for these signs:
- No jiggle — gently shake the pan; the filling should not move at all
- Firm centre — a gentle press with your fingertip should meet resistance, not sink
- Clean edges — the filling should have pulled away very slightly from the sides of the pan
If the cheesecake still wobbles after 6 hours, give it another 2–4 hours. Room temperature, refrigerator efficiency, and ambient humidity all affect setting time. For further reading, see sciencedirect.com.
Creative Variations to Try
Once you have mastered the base recipe, these four variations add variety without extra complexity.
Strawberry No Bake Cheesecake
Top with a quick strawberry compote: simmer 2 cups sliced strawberries, ¼ cup sugar, and 1 tablespoon lemon juice for 10 minutes. Cool completely before spreading over the set cheesecake.
Chocolate No Bake Cheesecake
Fold ½ cup melted, cooled dark chocolate (70% cocoa) into the cream cheese mixture before adding the whipped cream. Use an Oreo crust for maximum chocolate intensity.
Lemon No Bake Cheesecake
Increase lemon juice to 3 tablespoons and add 1 tablespoon lemon zest to the filling. Finish with a layer of store-bought lemon curd on top after chilling.
Mini No Bake Cheesecakes
Divide the crust and filling among a 12-cup muffin tin lined with paper liners. Chill for 4 hours. These are ideal for parties and portion control.
Troubleshooting Common Problems
Even experienced bakers encounter issues. Here is how to fix them:
| Problem | Likely Cause | Solution |
|---|---|---|
| Lumpy filling | Cold cream cheese | Soften at room temperature for 45+ minutes |
| Filling won't set | Too little chilling time | Refrigerate minimum 6 hours, ideally overnight |
| Soggy, crumbly crust | Too much butter | Measure carefully; pack crust very tightly |
| Grainy texture | Granulated sugar used | Always use powdered sugar in the filling |
| Dense, heavy filling | Whipped cream deflated | Fold gently in three additions; never stir |
| Watery, runny filling | Low-fat cream cheese | Use full-fat brick-style cream cheese only |
Storage and Make-Ahead Tips
This cheesecake is one of the best make-ahead desserts in any baker's repertoire.
Refrigerator Storage
- Keep covered tightly with plastic wrap or in an airtight container
- Stays fresh for up to 5 days
- Texture actually improves after the first day as flavours develop
Freezer Storage
- Freeze the whole cheesecake uncovered for 1 hour until firm
- Wrap individual slices in plastic wrap, then aluminium foil
- Freeze for up to 2 months without quality loss
- Thaw overnight in the refrigerator — never at room temperature
Best Make-Ahead Window
- Make the cheesecake up to 2 days in advance for the best flavour
- Add toppings (fresh fruit, compote, whipped cream) only just before serving
Serving Tips for Clean Slices
Follow these steps for professional-looking slices:
- Remove the springform ring 10 minutes before serving to let the sides settle
- Run a sharp knife under hot water, wipe it completely dry, then make your first cut
- Wipe the knife clean between every single slice
- Serve directly from the refrigerator — cold cheesecake slices cleanest
Topping Ideas
- Fresh strawberries, blueberries, or raspberries
- A drizzle of salted caramel sauce
- A dollop of whipped cream with a mint sprig
- A dusting of graham cracker crumbs for a rustic finish
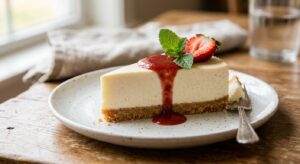 A clean slice reveals the creamy, mousse-like interior and the buttery graham cracker crust.
Frequently Asked Questions
Q1: Can I make this without a springform pan?
Yes. Use a regular 9-inch pie dish or a deep square baking pan lined with parchment paper. A springform pan makes removal and presentation easier, but a standard dish works perfectly — just serve directly from it using a pie server or large spoon.
Q2: How long does it need to set?
A minimum of 6 hours is required. However, overnight refrigeration of 8–12 hours is strongly recommended. This allows the filling to firm completely, the crust to bond, and the flavours to develop — resulting in a cleaner slice and superior texture.
Q3: Why is my cheesecake not setting?
The three most common causes are:
- Insufficient chilling time
- Low-fat or whipped cream cheese — these contain more water and less fat
- Under-whipped cream — it must reach true stiff peaks before folding
Q4: Can I use Cool Whip instead of heavy cream?
Yes. Substitute 2 cups of fully thawed Cool Whip for the whipped heavy cream. Fold it in gently. This substitution produces a slightly firmer set and is a great shortcut when you are short on time.
Q5: Can I add gelatin for a firmer set?
Absolutely. Dissolve 1 teaspoon unflavoured gelatin in 2 tablespoons cold water, let it bloom for 5 minutes, then microwave for 10 seconds until fully melted. Cool slightly, then blend into the cream cheese mixture before folding in the whipped cream. This is especially useful in warm or humid conditions.
Q6: What type of cream cheese should I use?
Always use full-fat, brick-style cream cheese. Philadelphia is the gold standard, but any quality full-fat block works. Avoid whipped cream cheese in tubs (too much air and water), spreadable versions (different fat ratio), and reduced-fat or fat-free options (will not set properly).
Q7: Can I freeze this cheesecake?
Yes — no bake cheesecake freezes exceptionally well for up to 2 months. Freeze whole or in individual slices wrapped in plastic wrap then foil. Thaw overnight in the refrigerator before serving.
Q8: Can I make this without an electric mixer?
You can make the cream cheese base by hand with a sturdy whisk, though it requires significant effort. Whipping heavy cream to stiff peaks by hand is very labor-intensive. An electric hand mixer or stand mixer is strongly recommended for the best results. If working by hand, ensure your bowl and cream are very cold — this reduces the time and effort required.
Conclusion
This no bake cheesecake proves that you do not need an oven, advanced skills, or expensive equipment to create a dessert that looks and tastes like it came from a bakery. The key principles are simple: use full-fat ingredients at room temperature, fold the whipped cream gently, and give it enough time in the refrigerator.
Your next step: Try the base recipe this weekend. Once you see how easily it comes together, experiment with one of the variations or add your own favourite topping. For more effortless desserts, browse our collection of no bake desserts or pair this cheesecake with a simple weeknight meal like easy chicken dinner recipes for a complete menu.


