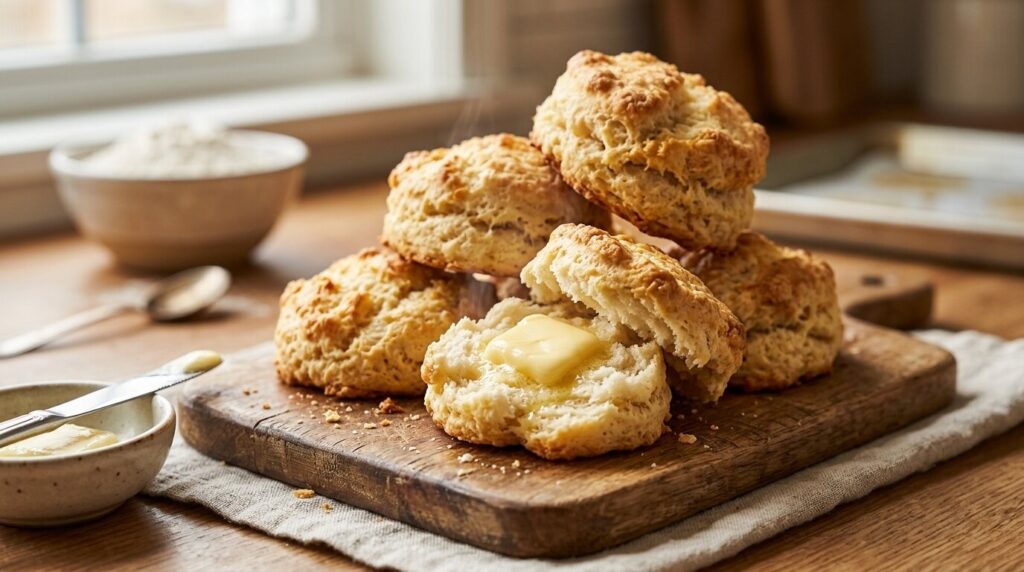
If you’ve ever wrestled with a rolling pin, dusted flour across your entire kitchen, and still ended up with tough, flat biscuits, I have good news: you’ve been making this harder than it needs to be. This easy drop biscuit recipe skips the rolling pin, the biscuit cutter, and the stress entirely. You mix a simple dough, scoop rough spoonfuls onto a baking sheet, and 15 minutes later you’re pulling golden, buttery, impossibly tender biscuits out of the oven.
I’ve made this recipe more times than I can count — for weeknight dinners when I forgot to plan a side, for lazy Sunday breakfasts with sausage gravy, and for holiday tables when the oven was already fighting for space. Drop biscuits have never once let me down, and once you understand why they work, you’ll wonder why you ever bothered with rolled biscuits at all. For more simple, rewarding cooking, browse our full collection of other easy recipes.
What Are Drop Biscuits? (And Why They’re Easier Than Rolled Biscuits)
Drop biscuits are a rustic, no-fuss variation of traditional Southern biscuits. Instead of rolling out dough and cutting it into neat rounds, you simply “drop” spoonfuls of a wetter, looser dough directly onto a baking sheet. The technique is intentionally forgiving — no precision cutting, no re-rolling scraps, no chilled work surfaces.
How drop biscuits compare to classic rolled biscuits:
| Feature | Drop Biscuits | Rolled Biscuits |
|---|---|---|
| Dough consistency | Wet, shaggy batter | Firm, rollable dough |
| Shaping method | Scooped and dropped | Rolled and cut into rounds |
| Gluten development | Minimal (no kneading) | Higher from rolling/re-rolling |
| Texture | Tender, craggy, crispy edges | Flaky, uniform layers |
| Prep time | 10–15 minutes | 30–40+ minutes with chilling |
| Skill required | Beginner-friendly | Moderate practice needed |
| Best for | Weeknight dinners, casual meals | Formal brunch, holiday tables |
The biggest technical advantage? You never re-roll scraps. Every re-roll develops more gluten, which makes rolled biscuits tougher. Drop biscuits eliminate that problem entirely. Twisting a biscuit cutter can also seal the edges and prevent proper rise — another issue drop biscuits avoid.
Why This Recipe Works (The Science in Simple Terms)
Good biscuits aren’t magic — they’re chemistry. Three things are doing the heavy lifting here:
-
Cold butter creates steam pockets. Small, cold pieces of butter melt quickly in a hot oven, releasing steam that pushes the dough upward. That steam expansion is what gives biscuits their flaky layers. In practice, grating frozen butter ensures the tiniest, most evenly distributed pieces.
-
Minimal mixing preserves structure. The less you stir, the less gluten forms. Gluten creates chew in bread — but in biscuits you want the opposite. Mix only until the flour disappears; a lumpy, shaggy dough is exactly right.
-
Buttermilk’s acidity activates leavening. The acid in buttermilk reacts with baking powder to produce extra carbon dioxide, giving you a stronger rise and a tangy, rich flavor that regular milk can’t replicate.
Why oven temperature matters just as much as ingredients:
-
A high, steady heat (450°F / 232°C) triggers “oven spring” — the rapid initial rise in the first few minutes of baking.
-
Trapped steam and gas expand quickly before the biscuit’s structure fully sets.
-
An oven that runs cool interrupts this process. Use an oven thermometer if yours tends to drift.
-
Opening the door too soon lets heat escape at the exact moment biscuits need it most. Don’t peek until at least 10 minutes have passed.
-
Fully preheating the oven is non-negotiable — not optional.
For a deeper look at how heat affects starch and protein in baked goods, the Oregon State University Extension offers excellent resources on the chemistry of home baking.
Ingredients You’ll Need (Just 5 Pantry Staples)
-
All-purpose flour — the structural base; provides just enough gluten to hold everything together without density. Spoon-and-level measure for accuracy.
-
Cold unsalted butter — the source of flakiness and rich flavor. Unsalted gives you precise control over salt. Grating frozen butter yields the best texture.
-
Buttermilk — adds tang and moisture, and reacts with the leavening agent for extra rise. Use cold, straight from the fridge.
-
Baking powder — the primary leavening agent. Freshness is critical; see troubleshooting below.
-
Salt — balances flavor and enhances the butter’s richness.
Why five ingredients is a feature, not a limitation:
- No yeast to proof.
- No specialty flour to track down.
- No obscure pantry item you’ll only use once.
- Fewer ingredients means each one carries more weight, which is why fresh baking powder and good butter make a real difference.
Ingredient Substitutions & Swaps
-
No buttermilk? Mix 1 cup regular milk with 1 tablespoon white vinegar or lemon juice, let sit 5 minutes, and use as a 1:1 replacement.
-
Dairy-free version: Use a plant-based butter alternative and dairy-free milk mixed with lemon juice for acidity. Chill the alternative butter well before grating.
-
Gluten-free flour: A 1:1 gluten-free baking blend works, though the texture will be slightly more delicate and crumbly. Add an extra tablespoon of milk if the dough seems dry.
-
Only have salted butter? Reduce added salt by about half (start with ¼ teaspoon) and adjust to taste.
Equipment You Actually Need (Spoiler: Not Much)
You’ll need:
- A large mixing bowl — any medium-to-large bowl will do.
- A pastry cutter, fork, or box grater — for cutting cold butter into the flour. A pastry cutter is fastest, but a box grater works beautifully with frozen butter.
- A large spoon or cookie scoop — a 2-tablespoon cookie scoop ensures even portions and minimal hand contact.
- A baking sheet lined with parchment paper — parchment prevents sticking and makes cleanup trivial. A silicone baking mat also works, but the bottoms may brown slightly less.
You will not need:
- A rolling pin
- A biscuit cutter
- A stand mixer
- A floured countertop
- A pastry board or bench scraper
How to Make Drop Biscuits (Step-by-Step)
-
Preheat your oven to 450°F (232°C). A hot oven is essential for the initial burst of steam that creates flaky layers. Let the oven fully preheat — at least 15 minutes — before baking.
-
Whisk the dry ingredients. Combine 2 cups all-purpose flour, 1 tablespoon baking powder, and ¾ teaspoon salt in a large bowl until evenly distributed.
-
Cut in the cold butter. Work ½ cup cold unsalted butter (grated or cubed) into the flour until the mixture resembles coarse crumbs with pea-sized pieces remaining. Pro tip: grating frozen butter is faster, more consistent, and gives better steam pockets than cutting it in with a knife.
-
Add the buttermilk. Pour in 1 cup cold buttermilk. Stir gently with a spatula just until the dough comes together — a shaggy, slightly wet texture is exactly right. Stop the moment no dry flour remains visible.
-
Let the dough rest for 5 minutes. This allows the flour to hydrate fully, which noticeably improves the final texture. Don’t skip this step.
-
Scoop and drop. Drop rounded mounds of dough (about 2 tablespoons each) onto the parchment-lined baking sheet, spacing them about 2 inches apart. A cookie scoop gives uniform shapes and helps avoid overhandling.
-
Bake for 12–15 minutes. Bake until tops are golden brown and biscuits have visibly risen. Avoid opening the oven during the first 10 minutes — that heat loss can collapse the oven spring.
-
Brush with melted butter. Brush immediately after baking for a glossy, flavorful finish. This also softens the crust slightly for a perfect bite.
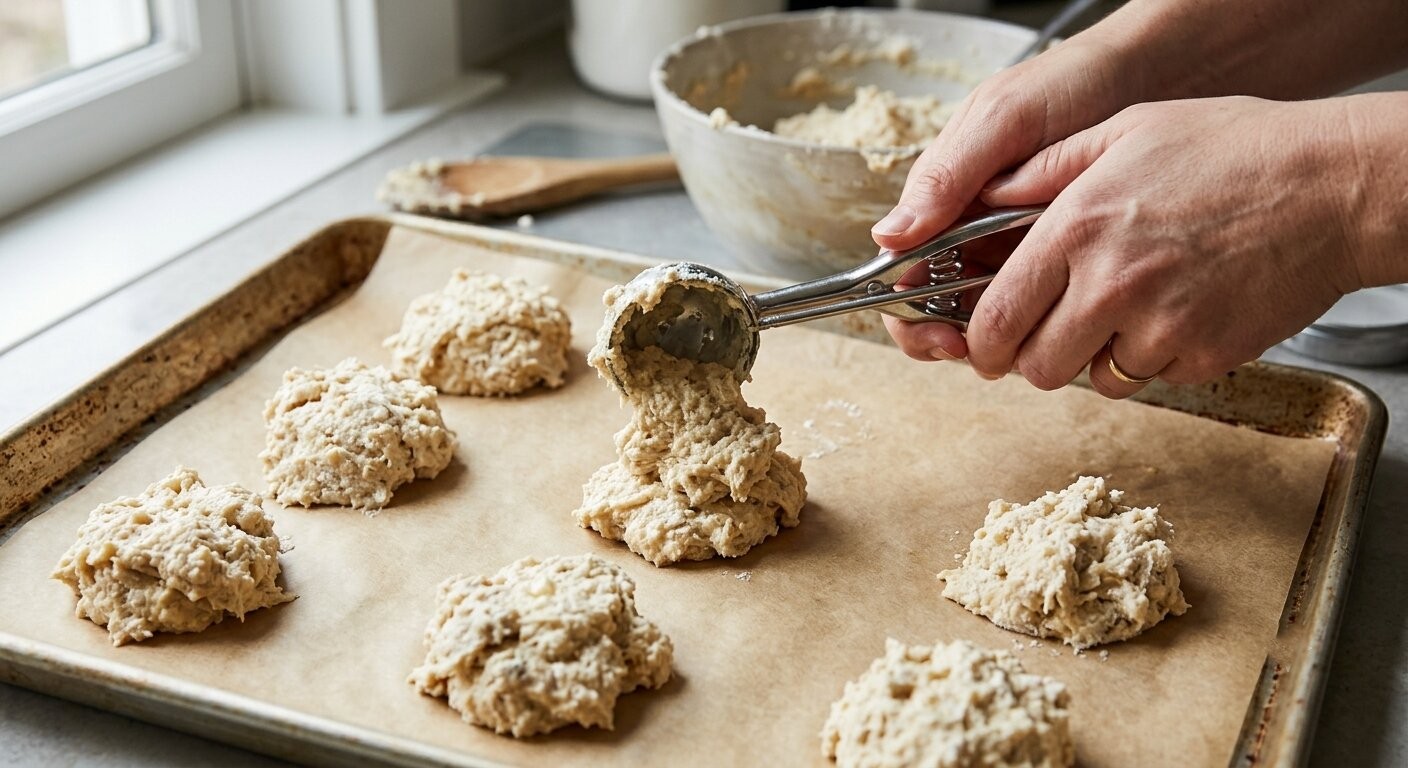 Scooping the wet dough directly onto parchment — no rolling or cutting required.
Common Mistakes That Ruin Drop Biscuits (And How to Avoid Them)
| Mistake | Result | Fix |
|---|---|---|
| Overmixing the dough | Tough biscuits | Stir just until flour disappears; a lumpy dough is fine |
| Warm or melted butter | Flat, greasy biscuits | Chill dough for 10 minutes if butter softens while working; grate frozen butter |
| Overcrowding the baking sheet | Uneven baking, steamed edges | Space mounds at least 2 inches apart |
| Old baking powder | Biscuits that won’t rise | Replace baking powder every 6 months; test by adding 1 tsp to hot water — it should fizz vigorously |
| Opening the oven too early | Collapsed biscuits | Don’t peek before 10 minutes of baking |
| Expired or low-quality buttermilk | Weak flavor and poor rise | Check the sell-by date; acidity weakens over time |
| Measuring flour incorrectly | Dense, dry biscuits | Spoon flour into the measuring cup and level with a knife — never scoop directly from the bag |
The one factor behind most of these mistakes: temperature control. Keep butter and buttermilk cold, and keep the oven fully preheated. A common error is letting the dough sit too long before baking — if your kitchen is warm, pop the sheet pan in the fridge for 5 minutes while the oven finishes preheating.
Tips for Extra Fluffy, Bakery-Style Drop Biscuits
- Freeze your butter for 15 minutes before grating — this guarantees the smallest, coldest pieces for maximum steam pockets.
- Use cold buttermilk straight from the fridge, not room temperature.
- Don’t skip the 5-minute resting step — it allows the flour to fully hydrate and relax the gluten that did form.
- Bake at a high temperature (450°F) for proper oven spring. In practice, this temperature range is the narrow window where the outside sets fast enough to trap internal steam while the inside cooks through.
- Brush with melted butter immediately after baking, not before — brushing before baking can make the surface less crispy.
- Use a light hand when scooping — less handling means a more tender biscuit.
- Space your scoops generously so edges crisp instead of steaming each other.
- Try a preheated cast iron skillet instead of a sheet pan for extra-crisp bottoms. Place the skillet in the oven while it preheats, then carefully drop the dough into the hot pan.
For another straightforward baked good that requires no rolling, check out our recipe for soft pretzel dough — the technique is equally beginner-friendly.
Flavor Variations to Try
All variations use the same base dough and bake time, so you can experiment freely:
- Cheddar-Chive: Fold in 1 cup shredded sharp cheddar and 2 tablespoons chopped fresh chives after adding the buttermilk.
- Honey Butter: Drizzle warm biscuits with a mixture of melted butter and honey (2 parts butter to 1 part honey) right after baking.
- Garlic Herb: Add 1 teaspoon garlic powder and 1 tablespoon chopped fresh herbs (rosemary, thyme, or parsley) to the dry ingredients.
- Sweet Cinnamon-Sugar: Sprinkle tops with cinnamon-sugar before baking for a dessert-style biscuit. Use 2 tablespoons sugar mixed with 1 teaspoon cinnamon.
- Bacon-Cheddar: Stir in ¼ cup crumbled cooked bacon with the cheddar. Cook the bacon until crisp for best texture.
- Jalapeño-Cheese: Add 2 diced jalapeños (seeds removed for less heat) and ¾ cup shredded pepper jack cheese.
- Parmesan-Black Pepper: Mix in ⅓ cup grated parmesan and 1 teaspoon freshly cracked black pepper. This makes an excellent savory side for pasta dishes.
Serve these alongside a hearty soup like our cheeseburger soup recipe for a complete meal.
What to Serve With Drop Biscuits
- Breakfast: Sausage gravy, scrambled eggs, or a drizzle of honey. For a full spread, add oven-baked bacon — it cooks hands-free alongside the biscuits.
- Soups and stews: Chili, beef stew, or tomato soup for dunking. A split drop biscuit topped with smoked sausage makes a quick weeknight dinner.
- Holiday sides: A great addition to Thanksgiving or Sunday dinner spreads. They soak up gravy beautifully.
- Sandwich base: Split and fill with fried chicken, ham, or egg. Spread spicy mayo on the cut sides for extra flavor.
- Sweet pairings: Fresh berries and whipped cream for a shortcake-style dessert, or a drizzle of honey butter.
How to Store and Reheat Drop Biscuits
Storage:
- Room temperature: Airtight container, up to 2 days. Place a paper towel in the container to absorb excess moisture.
- Refrigerator: Sealed container, up to 5 days. Cold air dries them out faster, so wrap tightly in plastic wrap first.
- Freezer: Freezer-safe bag, up to 3 months. Squeeze out as much air as possible.
Reheating:
- Oven method (best quality): 350°F for 8–10 minutes, wrapped loosely in foil. This restores the crispy exterior and tender interior closest to fresh-baked.
- Microwave method (quick): 20–30 seconds in a pinch, though texture will be softer and slightly chewy. Cover with a damp paper towel to retain moisture.
According to USDA guidelines for food safety, leftovers should be refrigerated within two hours of cooking and consumed within 3–4 days for best quality.
Can You Freeze Drop Biscuit Dough? (Make-Ahead Method)
- Scoop the raw dough into individual mounds on a parchment-lined tray.
- Flash-freeze for 1–2 hours until firm.
- Transfer the frozen mounds into a freezer bag or airtight container. Label with the date.
- Bake straight from frozen at 450°F, adding 3–5 extra minutes to the bake time.
This method means fresh, hot biscuits any morning without extra prep work — ideal for busy mornings or holiday hosting. You can also prepare the dough and keep it covered in the fridge for up to 24 hours before baking.
Recipe Card
Prep time: 10 minutes
Cook time: 15 minutes
Total time: 25 minutes
Yield: 8–10 biscuits
Ingredients:
- 2 cups all-purpose flour
- 1 tablespoon baking powder
- ¾ teaspoon salt
- ½ cup cold unsalted butter, grated or cubed
- 1 cup cold buttermilk
Instructions:
- Preheat oven to 450°F and line a baking sheet with parchment paper.
- Whisk together flour, baking powder, and salt.
- Cut in cold butter until the mixture resembles coarse crumbs.
- Stir in buttermilk just until combined.
- Let the dough rest for 5 minutes.
- Drop rounded spoonfuls of dough onto the prepared baking sheet.
- Bake for 12–15 minutes until golden brown.
- Brush with melted butter and serve warm.
 Finished biscuits brushed with butter — golden, craggy, and ready to serve.
Frequently Asked Questions
What is the difference between drop biscuits and regular biscuits?
Drop biscuits use a wetter dough that’s scooped directly onto a baking sheet, while regular biscuits use a firmer dough that’s rolled out and cut into shapes. Drop biscuits are faster to make and have a more rustic, craggy texture that is naturally tender because less gluten develops.
Why are my drop biscuits flat instead of fluffy?
Flat biscuits usually result from butter that was too warm, baking powder that’s lost its potency, or an oven that wasn’t fully preheated before baking. Check your baking powder’s freshness (it should fizz when added to hot water) and keep your butter cold until it hits the oven. If your kitchen is warm, chill the formed dough mounds for 10 minutes before baking.
Can I make drop biscuits without buttermilk?
Yes. Mix 1 cup of regular milk with 1 tablespoon of white vinegar or lemon juice, let it sit for 5 minutes, and use it as a direct substitute for buttermilk. The resulting acid level will still activate the baking powder for a good rise.
How do I know when drop biscuits are done baking?
Drop biscuits are done when the tops are golden brown and they’ve visibly risen, typically after 12–15 minutes at 450°F. The bottoms should also be lightly browned when checked. If inserted, a toothpick should come out clean or with a few moist crumbs.
Can I make the dough ahead of time?
Yes. You can prepare the dough, scoop it into mounds, and refrigerate for up to 24 hours before baking, or freeze the raw mounds for up to 3 months (bake straight from frozen, adding 3–5 minutes). Refrigerated dough may spread slightly more during baking; you can reshape the mounds gently before baking.
Why do you use cold butter in biscuits?
Cold butter creates steam pockets as it melts in the oven, which is what gives biscuits their flaky, tender layers. Warm or melted butter won’t produce the same rise or texture — it gets absorbed into the flour, resulting in a dense, greasy biscuit.
Can I freeze baked drop biscuits?
Yes. Baked biscuits can be frozen in an airtight container for up to 3 months and reheated in the oven at 350°F for 8–10 minutes wrapped in foil. For best results, freeze them immediately after they cool completely.
What’s the best flour for drop biscuits?
Standard all-purpose flour works best for this recipe, providing the right balance of structure and tenderness. Self-rising flour can be used if you omit the added baking powder and salt (use 2 cups self-rising flour, and reduce salt to ¼ teaspoon or omit entirely, as self-rising flour already contains salt).
Conclusion
Drop biscuits are proof that the simplest techniques often produce the most satisfying results. With just five ingredients, no rolling pin, and 25 minutes from start to finish, you can create golden, buttery biscuits that rival any bakery version. The real beauty of this recipe is its forgiveness — even on a rushed weeknight, with slightly warm butter or a distracted stir, you’ll still get something delicious. And once you master the base, the flavor variations are endless.
Your next step: Try this recipe tonight. Make a batch to go with dinner, freeze half the dough for a busy morning, or experiment with the cheddar-chive or honey butter variation. You’ll quickly see why drop biscuits should be a permanent part of your cooking routine. For more simple, from-scratch recipes that fit into real life, explore our easy Greek recipes at home, easy Swedish recipes at home, or easy Cuban recipes at home — all built on the same philosophy of accessible, confident cooking.


