
There’s a moment every home baker knows—you’re walking through a mall and that warm, yeasty, salty smell hits you before you even see the pretzel counter. Your feet just… go there. I’ve chased that exact smell more times than I’d like to admit, and after years of testing dough hydration levels, baking soda concentrations, and oven temperatures in my own kitchen, I finally cracked the code. This isn’t a “trust me, it’ll work” recipe. It’s a tested, troubleshooted, step-by-step guide built on real batches, real mistakes, and real fixes. By the end of this article, you’ll know exactly how to make chewy, buttery, golden-brown soft pretzels at home—and why each step matters.
Why This Soft Pretzel Recipe Actually Works
Most soft pretzel recipes online skip the why. They just tell you to boil dough in baking soda water and hope for the best. Understanding the mechanics behind each step is what separates a rubbery, pale pretzel from one with that deep mahogany crust and pillowy interior. You can also read our guide on marshmallow recipe.
Here’s what makes this recipe reliable:
- A short, high-hydration proof – keeps the interior soft without making the dough sticky or hard to shape.
- A baking soda bath (not lye) – home-safe, but concentrated enough to mimic that classic pretzel crust.
- A hot oven blast – anything below 425°F won’t give you that deep brown color in time.
- Butter, twice – once brushed on before baking to help browning, and again right after baking for that glossy, buttery mall-shop finish.
Each of these choices is intentional. Skip one, and you’ll notice the difference immediately. For more yeast-based breads that benefit from similar techniques, check out our collection of everyday recipes that use simple dough methods.
What You’ll Need: Ingredients Breakdown
Before jumping into the method, let’s talk ingredients—because in bread-making, ratios matter more than most people realize. Measuring by volume (cups) can introduce up to 20% variation in flour weight, which is the top cause of dense dough. A kitchen scale is your best friend here.
For the Dough
| Ingredient | Amount | Notes |
|---|---|---|
| Warm water | 1½ cups (360 ml) | 110°F (43°C)—hotter kills yeast |
| Active dry yeast | 2¼ teaspoons (1 packet) | Or 1¾ teaspoons instant yeast |
| Granulated sugar | 1 tablespoon | Feeds the yeast |
| Unsalted butter, melted | 4 tablespoons (57 g) | Use unsalted to control sodium |
| All-purpose flour | 4½ cups (540 g) | Bread flour works too; add 2–3 tbsp more water |
| Fine salt | 2 teaspoons | Table salt or fine sea salt |
For the Baking Soda Bath
- 10 cups (2.4 L) water
- ⅔ cup (160 g) baking soda
- 1 tablespoon brown sugar (optional—my personal trick for deeper color)
For Topping
- 1 large egg, beaten (egg wash)
- Coarse pretzel salt (or flaky sea salt)
- 2 tablespoons melted butter (post-bake brush)
Quick ingredient tips:
- Yeast: Active dry must be proofed in warm water first. Instant yeast can be mixed directly with flour—but if you use it, reduce the first rise time by about 15 minutes.
- Flour: All-purpose gives a perfect chewy-but-tender crumb. Bread flour yields a slightly firmer, more “bakery-style” chew.
- Butter: Don’t skip the post-bake brush. That final layer of melted butter is what turns a good pretzel into one that tastes like it came from a real pretzel shop.
Step-by-Step: How to Make Soft Pretzels at Home
Step 1: Activate the Yeast Properly
In a large mixing bowl, combine the warm water, sugar, and yeast. Let it sit for 5–8 minutes until it turns foamy on top. If it doesn’t foam, stop and start over—your yeast is likely dead. This step is non-negotiable. Starting over here saves you an hour of wasted proofing later.
Step 2: Mix and Knead the Dough
Add the melted butter, flour, and salt to the yeast mixture. Mix until a shaggy dough forms, then knead for 8–10 minutes by hand or 5–6 minutes with a stand mixer fitted with a dough hook.
You’re looking for a dough that is:
- Smooth and slightly tacky, not sticky.
- Elastic enough to stretch without tearing (do the windowpane test: stretch a small piece—if it forms a thin translucent sheet without breaking, it’s ready).
- Slow to spring back when poked.
If it’s too sticky, add flour one tablespoon at a time. Over-flouring is the number one reason home pretzels turn out dense instead of chewy. This same dough philosophy applies to other yeasted treats; for a sweet twist, see our tender cinnamon roll recipe that uses a similar kneading approach.
Step 3: The First Rise
Place the dough in a lightly oiled bowl, cover with a damp towel or plastic wrap, and let it rise in a warm spot for 60 minutes (or until doubled in size). Real talk: If your kitchen is cold, turn your oven on for 2 minutes, then turn it off and place the dough inside with the door cracked. This creates a warm, draft-free environment that speeds up proofing without cooking the dough.
Step 4: Divide and Shape
Punch down the dough. Divide it into 8 equal pieces (roughly 4.5 oz / 130 g each if using a kitchen scale). Roll each piece into a rope about 22–24 inches long, tapering the ends slightly thinner than the middle—thinner ends cook faster and won’t burn before the center is done.
To shape the classic pretzel twist:
- Form a U-shape with the rope.
- Cross the two ends over each other twice (this creates the twist).
- Fold the twisted ends down onto the bottom curve of the U, pressing gently to seal.
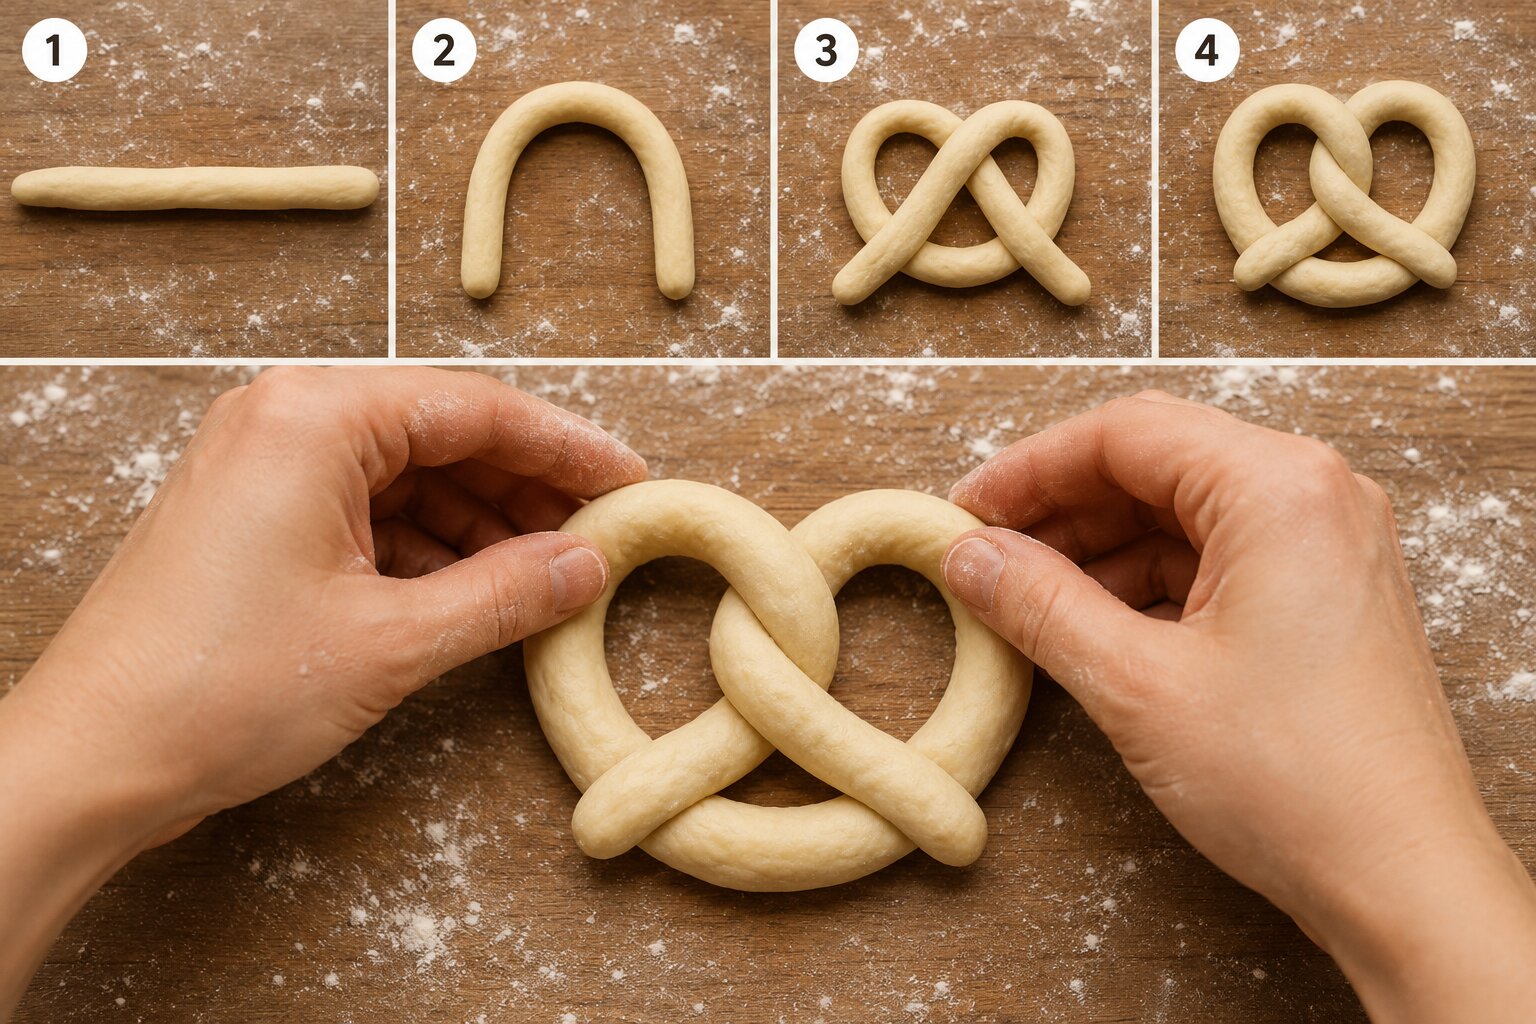 The twist should look symmetric with the ends tucked just under the bottom curve.
Step 5: The Baking Soda Bath (The Secret Step)
This is where most homemade pretzels either succeed or fail. Bring the 10 cups of water to a rolling boil. Add the baking soda carefully—it will fizz vigorously, so use a large pot. Stir in the brown sugar if using.
Using a slotted spatula, lower each pretzel into the bath for 20–30 seconds per side. Don’t skip this or shorten it. The baking soda bath is what gives pretzels their signature chewy crust and deep brown color. Without it, you’re just baking bread rolls shaped like pretzels.
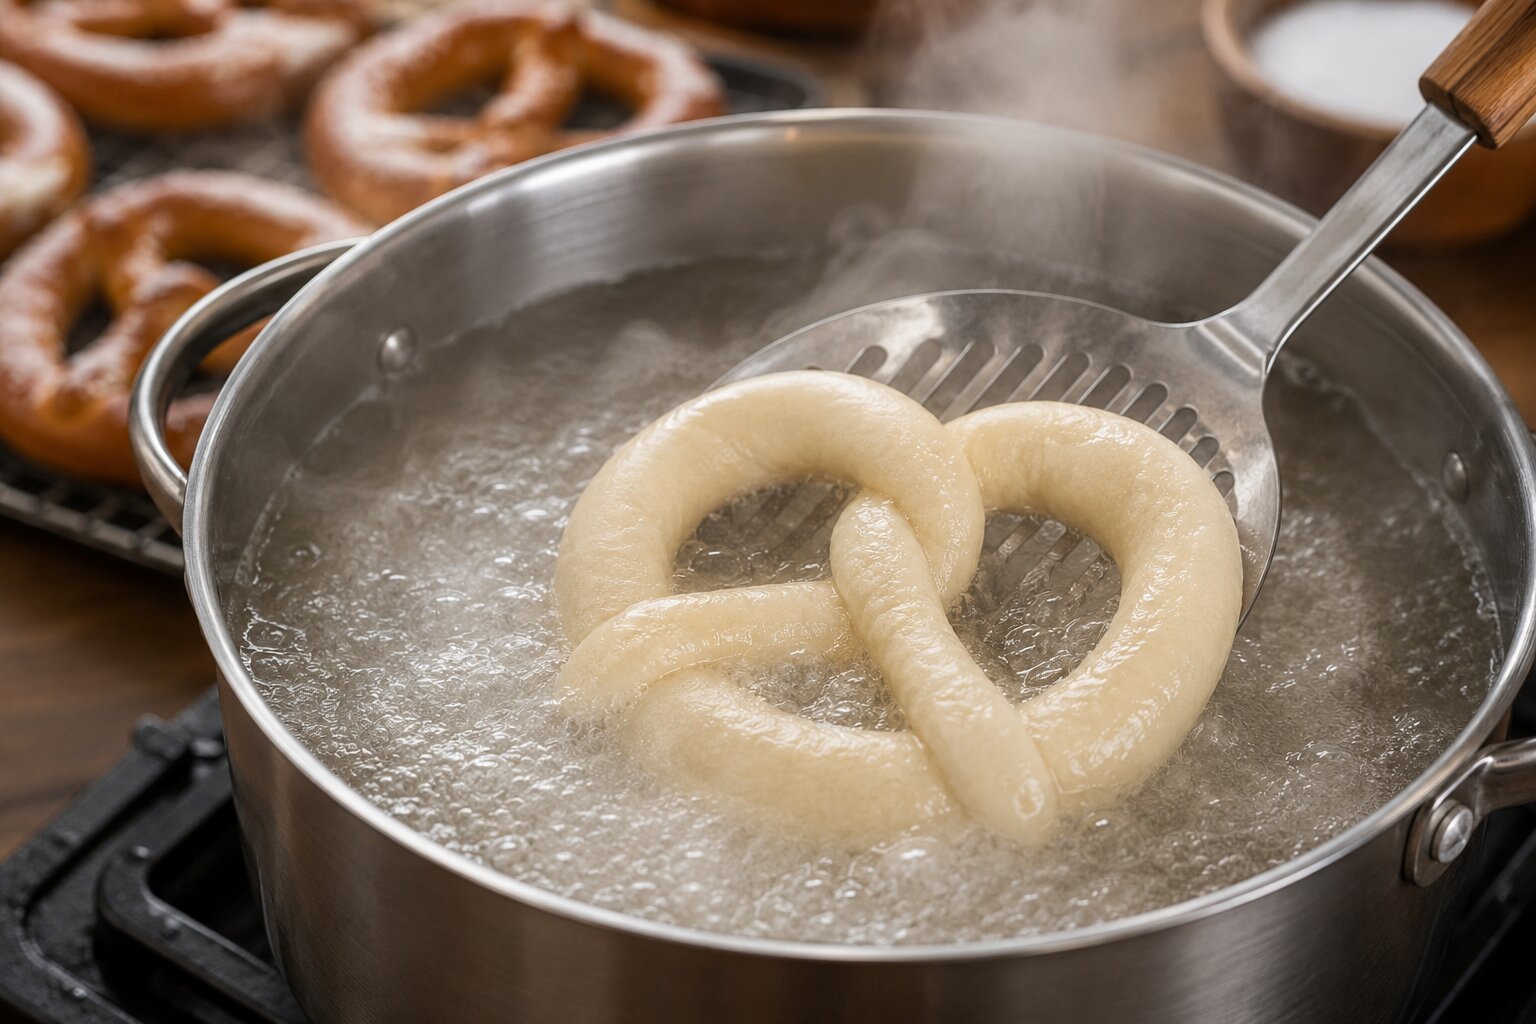 The boiling bath raises the dough’s surface pH, which encourages browning and creates that distinctive chew.
Step 6: Egg Wash and Salt
Transfer the boiled pretzels to a parchment-lined baking sheet (use a light-colored pan to prevent burnt bottoms). Brush each one generously with the beaten egg. Sprinkle with coarse pretzel salt while the wash is still wet so the salt sticks.
Step 7: Bake to Golden Perfection
Bake at 425°F (218°C) for 12–15 minutes. Watch closely after the 10-minute mark—ovens vary, and pretzels can go from golden to overdone within a couple of minutes. Remove once deep golden brown all over.
Step 8: The Final Butter Brush
As soon as the pretzels come out of the oven, brush each one with melted butter. Do this immediately—don’t wait until they’ve cooled. This is the step that gives mall pretzels their signature glossy, rich finish.
The Baking Soda Bath vs. Lye: What’s the Difference?
If you’ve researched authentic pretzel recipes, you’ve probably seen references to food-grade lye (sodium hydroxide). Professional bakeries often use it because it creates a more intensely colored, glossier crust than baking soda. Here’s the honest comparison:
| Factor | Baking Soda Bath | Lye Bath |
|---|---|---|
| Safety at home | Very safe | Requires gloves, goggles, ventilation |
| Crust color | Deep golden brown | Dark mahogany brown |
| Flavor difference | Slightly milder | Slightly more “authentic” tang |
| Availability | In every kitchen | Needs to be food-grade, sourced online |
| Time in bath | 20–30 seconds | 30–60 seconds (more caustic) |
Key takeaways:
- Baking soda is the smarter, safer choice for home bakers.
- The brown sugar trick mentioned earlier gets you remarkably close to bakery-style color.
- Lye is best left to experienced bakers with proper safety equipment—the USDA recommends avoiding lye in home kitchens unless you have specialized training.
Common Mistakes That Ruin Soft Pretzels (And How to Avoid Them)
I’ve made every one of these mistakes myself, so let’s save you the trouble.
- Skipping the foam test on yeast – if you don’t confirm your yeast is active before mixing the full dough, you risk a flat, dense pretzel that never rises properly.
- Over-proofing the dough – letting it rise too long (especially in a warm kitchen) causes it to collapse when shaped. Stick to the 60-minute mark and check for doubling, not a specific time.
- Weak baking soda bath – using too little baking soda or boiling for too short a time results in pale, bread-like pretzels. Use the full ⅔ cup and a full 20–30 seconds per side.
- Overcrowding the baking sheet – pretzels need space to expand in the oven. Overcrowding traps steam and prevents even browning. Use two sheets if needed, and rotate halfway through.
- Forgetting the post-bake butter – this one seems minor, but it’s the difference between a good pretzel and one that tastes like it came from a real pretzel shop.
Flavor Variations to Try
Once you’ve mastered the base soft pretzel recipe, here are variations worth experimenting with:
- Cinnamon Sugar Pretzels – skip the salt topping; brush with butter and dip immediately in a cinnamon-sugar mix (2 tbsp sugar + 1 tsp cinnamon) after baking.
- Garlic Parmesan Pretzels – brush with garlic butter (melted butter + minced garlic) and sprinkle grated parmesan right after baking.
- Everything Bagel Pretzels – swap coarse salt for everything bagel seasoning before baking.
- Jalapeño Cheddar Pretzels – fold ½ cup shredded sharp cheddar and 2 tbsp diced pickled jalapeños into the dough before the first rise.
- Pretzel Bites – cut ropes into 1-inch pieces instead of shaping full pretzels. Reduce bake time to 10–12 minutes. Great for dipping and parties.
The Best Dips for Homemade Soft Pretzels
A soft pretzel is only half the experience—the dip is where personal taste really comes in. Here are five crowd-pleasers:
- Classic Yellow Mustard – the mall-standard pairing for a reason. Tangy and sharp.
- Beer Cheese Dip – sharp cheddar melted with a splash of lager creates a rich, tangy dip. For a quick version, stir shredded cheese into a roux made with butter, flour, and milk, then thin with beer.
- Honey Mustard – a sweeter alternative that pairs beautifully with the salty crust. Mix equal parts Dijon and honey.
- Warm Cheese Sauce – nacho-style cheese sauce for a more indulgent option. Add a pinch of smoked paprika for depth.
- Chocolate Ganache – if you made the cinnamon sugar version, this turns it into dessert. Heat equal parts heavy cream and dark chocolate chips.
For more dipping ideas, browse our selection of savory sauces that complement bread-based snacks. Our spicy mayo recipe, for instance, adds a smoky kick to pretzel bites.
How to Store and Reheat Soft Pretzels
Homemade pretzels are best fresh, but they store well with the right method. Here’s how to keep them at their best:
Storing
| Method | Duration | Tips |
|---|---|---|
| Room temperature | Up to 2 days | Wrap in plastic wrap, then foil |
| Refrigerator | Up to 5 days | Airtight container |
| Freezer | Up to 3 months | Wrap individually in plastic, then place in a freezer bag. Press out excess air. |
Reheating
- Oven (best): 350°F (175°C) for 5–7 minutes wrapped in foil to keep them soft, then unwrapped for the last minute to re-crisp the crust.
- Air fryer: 300°F for 3–4 minutes. Works great for pretzel bites.
- Microwave: Best avoided—it makes the crust chewy in the wrong way and can turn the interior gummy.
Why Homemade Beats Store-Bought (Every Time)
There’s a reason home bakers keep coming back to homemade pretzels despite the extra steps:
- Freshness – nothing store-bought compares to a pretzel eaten within 10 minutes of leaving the oven.
- Control over salt and butter levels – mall pretzels are often oversalted; at home, you decide.
- No preservatives – just flour, yeast, water, butter, and salt.
- Customization – you can’t order a jalapeño cheddar pretzel bite platter at most mall counters.
Once you make a batch from scratch, the frozen grocery-store version starts to feel like a pale imitation.
Troubleshooting Guide: Quick Fixes
| Problem | Likely Cause | Fix |
|---|---|---|
| Pretzels are dense | Yeast didn’t activate, or dough was over-floured | Test yeast foam; measure flour by weight |
| Pale color after baking | Baking soda bath too weak or too short | Use full ⅔ cup baking soda; boil for full 20–30 seconds per side |
| Pretzels deflated after shaping | Dough over-proofed | Shorten rise time; check dough at 50-minute mark |
| Salt fell off after baking | Salt applied too late, egg wash dried | Apply salt immediately after egg wash while still wet |
| Bottom burned before top browned | Oven rack too low, or pan too thin | Move rack to middle position; use a light-colored baking sheet |
| Pretzels are too dry | Overbaked or dough too low hydration | Check oven temp with thermometer; add 2 tbsp more water next time |
Frequently Asked Questions
What makes pretzels chewy instead of bread-like?
The baking soda (or lye) bath is what creates a chewy pretzel crust. It changes the surface pH of the dough before baking, which produces the dense, slightly chewy exterior that separates a pretzel from a regular dinner roll. The effect is well-documented in food science; the University of Minnesota Extension has resources on how alkaline solutions affect starch gelatinization and browning.
Can I make soft pretzels without a baking soda bath?
Technically yes, but the result will taste and look like a soft bread roll rather than a true pretzel. The baking soda bath is essential for the characteristic chewy crust and deep brown color. If you absolutely must skip it, brush the pretzels with a mixture of egg wash and a pinch of baking soda—it won’t be the same, but it’s better than nothing.
Why did my pretzels turn out pale instead of golden brown?
This usually happens when the baking soda bath is too weak, the boiling time is too short, or the oven temperature is below 425°F. Increasing the baking soda amount and boiling for a full 20–30 seconds per side will fix this. Also check your oven temperature with an independent thermometer—many home ovens run 25–50°F cooler than their display says.
Can I use instant yeast instead of active dry yeast?
Yes. Instant yeast works faster and doesn’t require proofing in warm water first. If substituting, reduce the first rise time by about 15 minutes and watch the dough closely so it doesn’t over-proof. For detailed guidance on yeast types and substitution ratios, our guide to easy yeast-based baking covers the specifics.
How long do homemade soft pretzels stay fresh?
Home made soft pretzels stay fresh at room temperature for up to 2 days when wrapped tightly, up to 5 days refrigerated, and up to 3 months frozen. Reheat in the oven for best texture.
Is lye safer or better than baking soda for pretzels?
Lye produces a slightly darker, more authentic bakery-style crust, but it requires careful handling with gloves and proper ventilation. Baking soda is a safe, effective substitute for home bakers and produces very similar results. The brown sugar trick in this recipe helps close the visual gap.
Why is my pretzel dough too sticky to shape?
Sticky dough usually means it needs more kneading time or a small amount of additional flour. Add flour one tablespoon at a time during kneading until the dough is smooth and only slightly tacky. Over-flouring is more common and more damaging than under-flouring, so go slow.
Can I freeze soft pretzel dough before baking?
Yes. Shape the pretzels, freeze them on a tray until solid (about 1 hour), then transfer to a freezer bag. When ready to bake, thaw in the refrigerator overnight, complete the baking soda bath, egg wash, and salt steps, then bake as directed, adding 2–3 extra minutes to the bake time.
Final Thoughts: Bring the Mall Pretzel Counter Home
Making soft pretzels from scratch isn’t complicated once you understand the why behind each step—the yeast activation, the baking soda bath, the double butter brush. These aren’t arbitrary steps; they’re the exact mechanics that create that chewy, golden, salty experience you’re craving.
The best part? Once you’ve made this recipe once, you’ll never look at a food-court pretzel counter the same way again. You’ll know you can make something better, fresher, and exactly to your taste, right in your own kitchen.
Give this soft pretzel recipe a try this weekend—and don’t be surprised if it becomes a regular request in your house. Pair it with a warm cup of tea or a cold beer, and you’ve got the ultimate homemade snack.


