Boiling an egg is the first recipe many of us learn, yet it's one of the easiest kitchen skills to get wrong. A batch of hard-boiled eggs can feel like a lottery: will the shells rip off in frustrating pieces? Will the yolks sport that unappetizing green ring? The truth is, every common boiled egg failure is a predictable outcome of a few specific, controllable variables.
After extensive testing across standard and high-altitude kitchens, we've broken down exactly what changes the outcome. This guide doesn't offer a single generic timer. Instead, it gives you a reliable framework that works for your eggs, your altitude, and your preferred doneness. For more on this, see our guide on starbucks egg bites recipe.
Master this method and you unlock a world of quick, nutritious meals, from a perfectly paired breakfast to fast weeknight meal solutions. Mastering this method is as fundamental as perfecting other staple proteins in your weekly rotation.
The Science of the Perfect Boiled Egg
An egg is two different foods sealed in one shell. The albumen (egg white) and the yolk set at distinctly different temperatures:
- Egg white: Proteins begin to coagulate at 144°F (62°C) and fully set around 149°F (65°C).
- Egg yolk: Begins to thicken at 149°F (65°C) and fully firms up at roughly 158°F (70°C).
This temperature gap is why you can have a perfectly set white with a fully runny yolk. Overcooking pushes the white proteins beyond 160°F (71°C), squeezing out moisture and creating a rubbery texture. For more on this, see our guide on recipes.
The gray-green ring that sometimes appears around the yolk is a harmless chemical reaction—iron from the yolk reacting with sulfur from the white. It signals the egg was cooked too long or cooled too slowly. An immediate transfer to an ice bath halts this reaction before the ring can form.
The 4 Variables That Change Your Boil Time
There is no single correct time for "a boiled egg." Your exact timing depends on four specific factors. Understanding these is the difference between consistent results and disappointing guesswork. For more on this, see our guide on dr phil diabetes recipe.
1. Starting Temperature
Eggs straight from the refrigerator (roughly 40°F / 4°C) require roughly 1 minute longer to cook than eggs that have sat out and reached room temperature. Decide which approach you are using and stick with it.
2. Egg Size
According to USDA grading standards, a standard large egg weighs 50 to 56 grams. Jumbo eggs (over 56g) or medium eggs (under 50g) shift the cook time by roughly 1 minute. If you use extra-large or jumbo eggs, add 1 minute to your baseline time.
3. Altitude
Water boils at a lower temperature at higher altitudes. At sea level it is 212°F (100°C). At 3,000 feet it drops to about 207°F (97°C). This lower cooking temperature means the egg needs 1 to 2 minutes longer in the water to reach the same internal doneness. If you live above 2,000 feet (610m), add time to every method.
4. Desired Doneness
- Soft-boiled: Yolk is liquid and runny, white is fully set.
- Medium-boiled (jammy): Yolk is lightly set with a creamy, custard-like center.
- Hard-boiled: Yolk and white are fully firm and opaque.
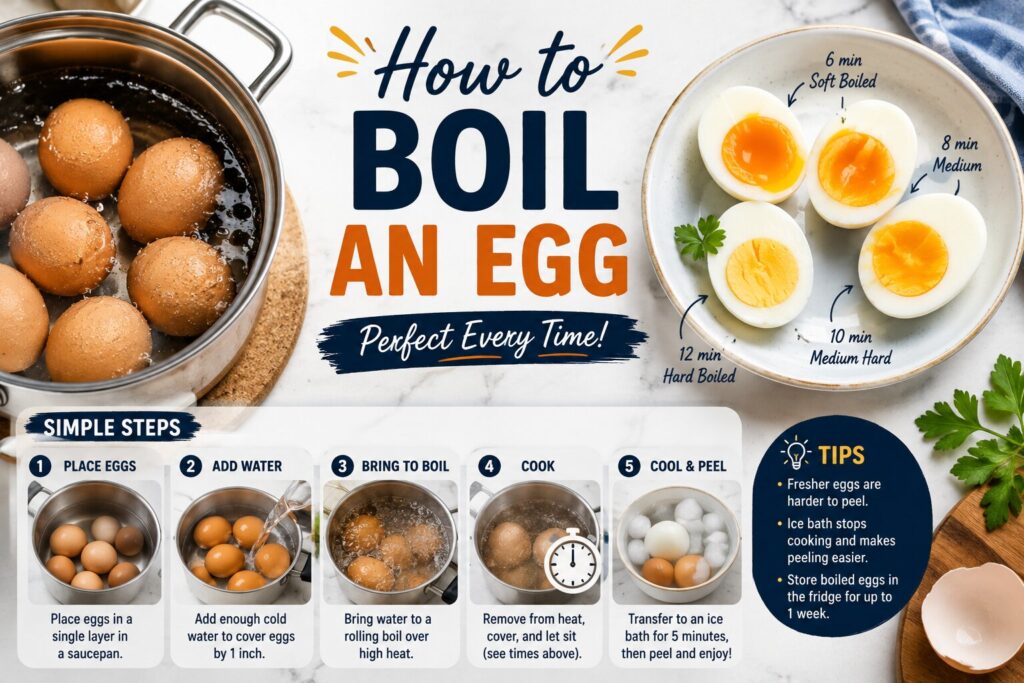
Quick Reference Boiling Time Table (Hot-Start Method)
The table below assumes standard large eggs at sea level, lowered gently into already-boiling water.
| Doneness | Yolk Texture | Fridge-Cold Time | Room Temp Time |
|---|---|---|---|
| Soft-Boiled | Runny, dippable | 6 minutes | 5 minutes |
| Medium-Boiled | Jammy, custard-like | 9 minutes | 8 minutes |
| Hard-Boiled | Fully set, crumbly | 11 minutes | 10 minutes |
Adjustments to apply:
- High altitude (above 2,000 ft / 610m): Add 1–2 minutes.
- Jumbo eggs: Add 1 minute.
- Cold-start method: Use the same total time, starting the timer the moment the water reaches a rolling boil and you turn off the heat.
Step-by-Step: The Hot-Start Method (Recommended)
This is the most reliable method for standard grocery-store eggs, which are rarely farm-fresh.
Tools You'll Need:
- Medium saucepan
- Slotted spoon
- Large bowl for ice bath
- Ice cubes
- Kitchen timer
Instructions:
- Prepare the ice bath. Fill the large bowl with ice and cold water. Prepare this before you start boiling—you will need it immediately later and every second counts.
- Bring water to a rolling boil. Fill the saucepan with enough water to cover the eggs by at least 1 inch (2.5 cm). Bring it to a full, vigorous boil over high heat.
- Lower eggs gently. Use the slotted spoon to lower eggs into the boiling water one at a time. Dropping them causes thermal shock, which cracks the shell.
- Start your timer. Set the timer to the exact time from the table above, including your adjustments. Reduce heat slightly to maintain a steady boil without a violent bounce that could crack shells.
- Shock in ice bath. The second the timer goes off, use the slotted spoon to transfer the eggs to the ice bath. Let them sit for at least 5 minutes. This stops carry-over cooking instantly and makes peeling far easier.
Step-by-Step: The Cold-Start Method (Better for Fresh Eggs)
Very fresh eggs (less than a week old) have a lower pH and tighter membrane bonds, making peeling notoriously difficult. The cold-start method is gentler and gives much better peeling results with fresh eggs.
- Place eggs in a single layer in the saucepan.
- Cover with cold water by 1 inch (2.5 cm).
- Bring to a rolling boil over high heat.
- As soon as it reaches a full boil, cover the pan, turn off the heat, and start your timer. Use the exact same cook time from the table.
- Immediately transfer to an ice bath when the timer goes off.
Alternative Cooking Methods
| Method | Best For | Batch Size | Peeling Ease | Special Equipment Needed |
|---|---|---|---|---|
| Stovetop Hot-Start | Standard eggs, precision | 1–12 | Good | None |
| Stovetop Cold-Start | Very fresh eggs | 1–12 | Excellent | None |
| Steamed | Very fresh eggs, no-crack guarantee | 1–8 | Excellent | Steamer basket |
| Instant Pot | Batch cooking, hands-off | 6+ | Excellent | Electric pressure cooker |
| Sous Vide | Absolute precision, no green ring | 1–12 | Excellent | Sous vide machine |
Steaming: Place eggs in a steamer basket over 1 inch of boiling water. Cover and steam. Use the same time as the hot-start method. Steam cooks at the same 212°F (100°C) as boiling water, but without the turbulence that can crack shells.
Instant Pot: Add 1 cup of water to the pot. Place eggs on the trivet. Cook on high pressure for the same time as your stovetop boil time. Let the pressure release naturally for 5 minutes before a quick release.
Sous Vide: Set the water bath to 167°F (75°C) for soft-boiled, 180°F (82°C) for jammy, or 194°F (90°C) for hard-boiled. Cook for 45–60 minutes. The result is perfectly consistent every time, with zero green ring.
If you prefer faster cooking with different appliances, you might also explore convenient air fryer methods for other quick proteins.
7 Common Mistakes That Ruin Boiled Eggs
Adding eggs to water that isn't fully boiling. Uneven cooking and sticky shells are the result. Wait for a vigorous, rolling boil before adding your eggs.
Skipping the ice bath. The egg continues cooking from its own residual heat, guaranteeing a green ring and rubbery texture. An ice bath is non-negotiable for perfect results.
Peeling while the egg is still warm. Warm eggs are nearly impossible to peel cleanly because the shell membrane bonds tightly to the white. Let them cool completely in the ice bath for at least 5 minutes (or overnight in the fridge).
Using ultra-fresh eggs for hard-boiling. The best eggs for hard-boiling are 7 to 14 days old. Fresh eggs have a tiny air cell and an acidic white that binds the membrane to the shell. Older eggs develop a larger air pocket and a higher pH, both of which make peeling effortless.
Guessing the time. A dedicated kitchen timer is your single most important tool. Don't rely on memory or a phone timer that might dim or lock.
Crowding the pan. Eggs need room to cook evenly. Cook them in a single layer with space between them. Overcrowding leads to uneven doneness and cracked shells.
Storing peeled eggs dry. Peeled eggs dry out quickly and absorb odors from the fridge. Store them in an airtight container with a damp paper towel and use within 3 to 5 days. Unpeeled eggs last up to 7 days.
How to Peel Boiled Eggs (Effortlessly Every Time)
Difficult peeling is the most common complaint about boiled eggs. Here is the exact routine to solve it:
- Use older eggs. This is the single most impactful step. Eggs that are 7–14 days old peel significantly easier than fresh ones.
- Ice bath for at least 5 minutes (15 minutes is even better). The rapid thermal contraction shrinks the egg slightly inside the shell, breaking the membrane seal.
- Crack the shell everywhere. Roll the egg gently on the countertop under your palm to create a fine web of cracks across the entire shell.
- Peel under running water. A thin stream of cool water washes away small shell fragments and helps separate the membrane.
- Start at the wide end. The air pocket at the wider end gives you the first flap of membrane to grab.
Non-Negotiable Food Safety Rules
Boiled eggs are generally low-risk, but improper handling can introduce foodborne illness.
- Start with intact shells. Discard any eggs with visible cracks before cooking. Bacteria can enter through shell fractures. The USDA Food Safety and Inspection Service provides detailed egg safety guidelines on this topic.
- Cook to the right temperature. The USDA recommends cooking eggs until both the white and yolk are firm (160°F / 71°C). If you prefer a runny or soft yolk, use pasteurized eggs, which are heat-treated to kill Salmonella without cooking the egg. Pasteurized shell eggs are widely available in US grocery stores.
- The 2-hour rule. Discard any boiled eggs left at room temperature for more than 2 hours (or 1 hour if the ambient temperature is above 90°F / 32°C). If serving at a picnic or brunch, keep them on ice.
Storing Boiled Eggs for Maximum Freshness
- Unpeeled: Store in the shell in the refrigerator for up to 7 days. The shell protects the egg from moisture loss and fridge odors.
- Peeled: Store in an airtight container with a damp paper towel on top. Use within 3 to 5 days. Label the container with the boil date so you know exactly when they were cooked.
- Do not freeze. Freezing ruins the texture of a boiled egg white, making it watery and rubbery upon thawing.
Frequently Asked Questions
How do I know when a boiled egg is done without cutting it? The spin test works reasonably well: a hard-boiled egg spins smoothly and quickly on a countertop, while a soft-boiled egg wobbles. However, the most reliable method is using an exact timer.
What causes the green ring around the yolk? Overcooking and slow cooling. The iron in the yolk reacts with sulfur in the egg white. It is safe to eat but has a dry, chalky texture. An immediate ice bath prevents it entirely.
Can I boil eggs from frozen? No. Never boil a frozen egg. The shell will crack, and the yolk becomes rubbery and unpleasant. Thaw frozen eggs in the refrigerator overnight before cooking.
Why did my egg crack while boiling? Thermal shock is the most common cause. This happens when fridge-cold eggs are dropped into violently boiling water. Gently lowering them with a slotted spoon and using the cold-start method for fresh eggs significantly reduces cracking.
Is it safe to reheat boiled eggs? Yes, though reheating can make the white tough. Briefly submerge the egg in near-boiling water for 30–60 seconds. Avoid microwaving whole hard-boiled eggs in the shell, as they can explode from steam pressure.
How long can I store hard-boiled eggs? Unpeeled hard-boiled eggs keep in the refrigerator for up to 7 days. Peeled eggs last 3 to 5 days if stored in an airtight container.
Conclusion
A perfect boiled egg isn't luck—it is a repeatable process governed by heat, time, and a handful of easily controlled variables. By choosing the right method for your eggs, setting an exact timer, and using an ice bath, you can eliminate the guesswork and produce flawless eggs every single time.
Whether you are meal-prepping for a well-rounded meal plan, layering them into seasonal fruit and juice ideas, or simply perfecting a classic breakfast alongside sweet homemade pastries, this foundational cooking skill will serve you well. Now, grab a dozen eggs, set your timer, and cook with confidence.


