
There is a specific kind of magic that happens when you walk through your front door after a long day and the entire house smells like Sunday dinner. That is exactly what a great slow cooker pot roast delivers – and it does it with almost zero effort on your part.
But here is the truth most recipes skip: not all slow cooker pot roasts are created equal. Some come out dry and bland. Some are tender on the outside but tough in the middle. After years of testing and tweaking, the formula for a melt-in-your-mouth result every single time comes down to a handful of non-negotiable steps.
Why the Slow Cooker Is Perfect for Pot Roast
The science is straightforward. Tough, collagen-rich cuts of beef need low, sustained heat to break down connective tissue into gelatin. That gelatin creates the silky, pull-apart texture that defines a great pot roast.
A slow cooker holds a steady 190°F–210°F on the LOW setting – the perfect range for collagen conversion without drying the meat out.
Key benefits of slow cooker pot roast:
- Hands-off cooking – season, sear, set it, and walk away
- Consistent, even heat that prevents over-cooking
- Self-basting environment – the sealed lid recirculates steam continuously
- Deep, concentrated flavor that develops over 8–10 unattended hours
- Budget-friendly – the toughest and cheapest cuts produce the best results
- Meal-prep ready – one batch covers multiple meals across the week
Choosing the Best Cut of Beef
This is the single most important decision you will make. Do not use a lean cut. Lean beef dries out no matter how good your technique is.
The Best Cuts Ranked
- Chuck Roast – Best Overall
- Heavy marbling and thick collagen ribbons that melt into gelatin
- Ideal weight: 3–4 lbs, bone-in or boneless
- Most widely available and most affordable option
- Bottom Round Roast – Best Budget Pick
- Slightly leaner but still produces good results
- Requires a full 10 hours on LOW for proper tenderness
- Brisket – Best for Deep Flavor
- Choose the point cut (fattier) over the flat cut (leaner)
- Takes up to 12 hours but delivers extraordinary richness
- Bone-In Short Ribs – Best for Special Occasions
- Produces a restaurant-level, luxurious pot roast experience
- The bone adds significant depth to the cooking liquid
Cuts to Always Avoid
- Sirloin or tenderloin – too lean, will dry out entirely
- Eye of round – minimal marbling, becomes rubbery under long heat
- Tri-tip – better suited for grilling, not braising
Pro Tip: Always look for visible white marbling streaked throughout the meat. That fat is flavor and moisture – it bastes the meat from the inside as it renders.
The Complete Ingredient List
Serves 6 | Based on a 3.5–4 lb chuck roast
For Seasoning the Roast:
- 3.5–4 lb chuck roast, patted completely dry
- 1½ tsp kosher salt
- 1 tsp freshly cracked black pepper
- 1 tsp garlic powder
- 1 tsp onion powder
- 2 tbsp neutral oil for searing
For the Braising Liquid:
- 1 cup low-sodium beef broth
- ½ cup dry red wine (or substitute additional broth)
- 2 tbsp Worcestershire sauce
- 2 tbsp tomato paste
- 4 garlic cloves, smashed
Vegetables and Aromatics:
- 1 large yellow onion, roughly chopped
- 3 large carrots, cut into 2-inch chunks
- 1 lb baby potatoes, halved
- 4 sprigs fresh thyme
- 2 sprigs fresh rosemary
- 1 bay leaf
Step-by-Step Instructions
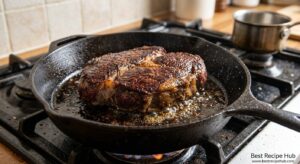
Step 1: Season and Sear the Roast
Searing is non-negotiable for deep flavor. Here is the exact process:
- Remove the roast from the fridge 30 minutes before cooking
- Pat all surfaces completely dry with paper towels
- Combine salt, pepper, garlic powder, and onion powder – rub the entire roast generously
- Heat oil in a cast iron skillet over HIGH heat until shimmering
- Place the roast in the pan – do not move it for 3–4 minutes per side
- You want a deep, dark mahogany crust – not gray, not light tan
- Sear all sides, including the narrow edges, for full coverage
Why this matters: The Maillard reaction during searing creates hundreds of flavor compounds that slow cooking alone cannot replicate. Skipping it produces a noticeably blander roast.
Step 2: Build the Flavor Base
Use the same pan – do not wipe it out:
- Sauté the chopped onion in the drippings for 2 minutes
- Add the smashed garlic and cook 30 seconds until fragrant
- Pour in the red wine or broth to deglaze – scrape every browned bit from the bottom
- Whisk in tomato paste and Worcestershire sauce until fully combined
- Transfer the entire mixture into the slow cooker
Why these two ingredients are essential:
- Tomato paste – concentrated glutamates that dramatically boost savory depth
- Worcestershire sauce – fermented, anchovy-based umami that amplifies beefy flavor
- Together they create a braising base that makes guests ask what your secret is
Step 3: Layer the Slow Cooker
Order and placement directly affect the outcome:
- Bottom layer – spread carrots and potatoes across the base (they act as a natural rack)
- Middle – place the seared roast on top of the vegetables
- Liquid – pour the braising liquid around (never over) the roast, covering the bottom third to half
- Top – lay thyme sprigs, rosemary, and bay leaf directly on the roast
Step 4: Cook Low and Slow
| Setting | Time | Result |
| LOW | 8–10 hours | Melt-in-your-mouth, full collagen breakdown |
| HIGH | 4–5 hours | Cooked through but noticeably less tender |
| LOW overnight | 10–12 hours | Fall-apart, deeply concentrated flavor |
- Always choose LOW if you have the time – the difference is significant
- Target an internal temperature of 200–205°F for full gelatin conversion
- Use a meat thermometer – it is the only reliable way to confirm true doneness
- The roast should pull apart effortlessly with two forks when ready
Step 5: Rest, Pull, and Make Gravy
- Lift the roast onto a cutting board – rest for 10–15 minutes
- Pull apart with two forks or slice against the grain
- Skim visible fat from the surface of the remaining cooking liquid
To make a quick, thick gravy:
- Strain 2 cups of cooking liquid into a small saucepan
- Bring to a gentle simmer over medium heat
- Whisk 2 tbsp cornstarch + 2 tbsp cold water into a smooth slurry
- Slowly whisk the slurry into the simmering liquid
- Stir constantly for 3–5 minutes until thickened
- Season with salt and pepper – serve immediately
Common Mistakes to Avoid
| Mistake | Why It Hurts | The Fix |
| Not drying the meat | Moisture prevents browning | Pat completely dry before searing |
| Lifting the lid | Each peek loses 15–20 min of heat | Trust the process – leave it closed |
| Cooking on HIGH | Fibers tighten before collagen dissolves | Choose LOW whenever possible |
| Too much liquid | Dilutes flavor and braising effect | Keep liquid to bottom third of the roast |
| Skipping the sear | Flat, one-dimensional flavor | Always sear first |
| Using a lean cut | No technique rescues sirloin | Choose chuck roast every time |
| Not resting the meat | Juices run out when you cut immediately | Rest 10–15 minutes without exception |
Storage, Reheating, and Leftovers
Slow cooker pot roast tastes better the next day. Flavors meld and intensify as the meat rests in its braising liquid overnight.
Storage guidelines:
- Refrigerator: Shredded beef stored in cooking liquid – up to 4 days
- Freezer: Portioned with liquid in freezer-safe containers – up to 3 months
- Reheating: Low and slow on the stovetop with a splash of broth – the microwave dries the meat unevenly
Five creative ways to use leftovers:
- Pot roast tacos – shredded beef with salsa, pickled onions, and cilantro
- Beef and potato hash – pan-fried with onions and a fried egg on top
- Open-faced sandwiches – on toasted sourdough with provolone and gravy
- Beef pot pie – mix with peas and carrots under a buttery pastry crust
- Beef ramen – shredded into broth with noodles and a soft-boiled egg
Best Side Dishes to Serve With Pot Roast
A great slow cooker pot roast deserves sides that complement its richness:
- Creamy mashed potatoes – the ultimate vehicle for braising liquid gravy
- Buttered egg noodles – a classic pairing that soaks up every drop of sauce
- Crusty sourdough bread – for mopping the bowl completely clean
- Roasted green beans or broccolini – brightness that balances the richness
- Simple arugula salad with lemon vinaigrette – the acidity cuts through the fat perfectly

Frequently Asked Questions
Q1: What is the best cut of meat for slow cooker pot roast?
Chuck roast is the best choice. It has the ideal ratio of fat, marbling, and connective tissue that fully breaks down into rich gelatin during long, slow cooking. A 3–4 lb chuck roast consistently produces fork-tender, deeply flavorful results and is the most widely available option at grocery stores.
Q2: How long should I cook pot roast in the slow cooker?
Cook on LOW for 8–10 hours or HIGH for 4–5 hours. LOW is always preferred. Extended gentle heat fully converts collagen into gelatin, producing the melt-in-your-mouth texture that defines a great pot roast. High heat cooks the roast but produces noticeably less tender results.
Q3: Do I have to sear the meat before slow cooking?
Searing is not required for food safety but is strongly recommended for flavor. The Maillard reaction creates hundreds of complex flavor compounds that slow cooking alone cannot replicate. Skipping this step produces a pot roast that is significantly blander – the difference is immediately noticeable side by side.
Q4: How much liquid should I add to the slow cooker?
Add enough to cover the bottom third to halfway up the sides of the roast – approximately 1 to 1.5 cups total. The beef releases significant additional moisture during cooking. Too much liquid dilutes the braising liquid flavor and weakens the final gravy.
Q5: Can I put frozen beef directly in the slow cooker?
No. Never cook frozen beef in a slow cooker. The meat spends too long in the bacterial danger zone (40°F–140°F) as it slowly thaws, creating a serious food safety risk. Always fully thaw your roast in the refrigerator for 24 hours before placing it in the slow cooker.
Q6: Why is my pot roast still tough after 8 hours?
Toughness after long slow cooking typically means one of two things: the wrong cut was used (lean cuts will not tenderize regardless of time), or the roast simply needs more time. Add 1–2 more hours on LOW and test again. Collagen breakdown requires sustained, consistent heat – it cannot be rushed.
Q7: When should I add vegetables to the slow cooker?
Root vegetables – carrots, potatoes, and celery – can go in at the very beginning. Placing them on the bottom of the slow cooker actually protects them while creating a natural rack for the roast. Delicate vegetables like peas, zucchini, or spinach should only be added in the last 30–60 minutes to prevent mushiness.
Q8: How do I make a thick gravy from the slow cooker liquid?
Strain 2 cups of cooking liquid into a saucepan and bring to a simmer. Whisk 2 tablespoons cornstarch with 2 tablespoons cold water to form a slurry, then whisk it into the simmering liquid. Stir constantly for 3–5 minutes until thickened to your preferred consistency. Season with salt and pepper before serving.
A slow cooker pot roast is more than just a meal – it is the kind of cooking that fills a home with warmth and brings people together without stress. Master this recipe once, and it earns a permanent place in your weekly rotation.